Be sure to fill and clean your resin parts. I do not use mold release in my molds, but the resin still can pick up some oil contamination from the silicone rubber mold. Soaking in tire bleach or spray and rinse down with oven clean works well. Also, when sanding the surface of the resin its recommended to use Dawn dishwashing soap as that helps get any possible grease off Wash and soak all resin parts in Tire Bleach overnight. This will remove all contamination/oil off the resin. 99% isopoyl alcohol works really good too! After the Tire Bleach Bath, use a scratch pad and scuff up the entire surface to clean and scratch up the surface for proper Primer adhesion. Using a high grit sandpaper to clean up and scratch up the surface is also recommended. Failing to clean the surface will result in paint not adhering or paint reaction. Fill in any pin holes or air bubbles in the resin with putty or Bondo Spot filler and sand smooth. This is the most important part of the build.
Parts list:
These are the parts lists for the following kits: Pennzoil, Penske, Miller High Life Penske, Interscope, Machinists Union, Skoal Bandit, and Coors Light.
Penske Parts list
Coors Light Parts List:
Machinist Union Parts list:
Skoal Bandit Parts List:
Interscope Racing Parts List:
Drill out the locations on the body
Glue the top rear suspension like shown in the example below
Drill out the rear hubs with a #49 0.073" drill
Glue the rear hub/brake assembly to the top rear suspension. Take note there is a difference between the right and left hub. The difference is on the bottom where the bottom wishbones are attached
Attach the rear wishbones to the bottom of the rear hubs. Be sure to observe the difference between the right and left wishbones.
Push the brass axle rods into the hubs into the drilled-out trans-axle
Insert front wishbones to the front end. Make sure to test fit before gluing and understand the difference between the left and right-hand wishbones.
Attach front hubs to front wishbones
Test fit the front hubs, making sure everything is level and your ride height is correct
Test fit wheels and tires to ensure proper ride height and squareness
Glue on the front brakes.
Glue on the roll bar, Fuel inlet, and popoff valve
Attach rear wing support, rear wing and endplates
Since all Marches have different exhaust exit layouts, you will need to use the Dremel to expand the hole side length and size
Glue Windscreen, I like using AK Crystal Magic Clue (AK9323)
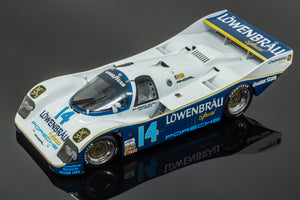
This conversion kit is for any of the1/24 Hasegawa or Revell Porsche 962C kitsand will replicate the 1987 24 hours of Daytona winning car of Al Holbert, Derek Bell, Chip Robinson and Al Unser Jr.
You can purchase a conversion kit frommy website HERE… Easy checkout, you dont need any account, I accept Paypal and credit card. The kit comes with the proper turbo hump that was used in the 1987 24 Hours of Daytona, along with replacement side panels, naca roof duct, naca duct plugs, BBS wheels, and simple instructions.
The Donor kit you need
Any of the 1/24 Hasegawa or Revell Porsche 962c kits will work, even though each kit might have different wheels in the kit, thats doesn’t matter as our IMSA Porsche 962 conversion kit comes with BBS wheels
Indycalshas a beautifuldecal sheetfor this kit. Thesedecalsaccurately depict the winning car from the 1987 24 Hours of Daytona.
The build-up…..
I recommend usingGrey and White Tamiya lacquer Surface Primerfor this build. Its important to use lacquer on resin parts for best results. Its best to avoid enamel paints over resin parts at all cost. Unless you use lacquer primer as a base, you can apply enamel over lacquer paint.
The recommend color for this build: Tamiya TS26 Prue whitefor the overall body color
Sawing off tail end of the rear ground effect tunnels The first step is to cut of the last part of the under-tray to fit on the larger ground effect tunnels. Using a Razor saw, saw right on the leading edge of the rear bottom A-arm mounting point.
Superglue the ground effect tail end onto the plastic kit chassis. Be sure to use plenty of glue for a good weld
AddApoxie-Sculpt, if needed to fill-in any gap of ridge. Sand the bottom of the tunnels smooth after theApoxie-Sculptcures….
Test fitting and marking cutout section of turbo hump Test fit the turbo hump on the rear. The resin turbo hump has an indention of the naca duct underneath that will help align the turbo hump on-top of the body work. But, before gluing the turbo hump on-top of the bodywork, I recommend tracing out a section where the vents of the turbo hump is, to cut out an open section for a more realistic look. Not opening up this section inside of the turbo hump vent section will make for a tricky painting situation later on.
Grinding out rear naca ducts Using a Dremel, grind out the square raised part of the rear side naca ducts
rear naca duct resin plugs Test fit on the two rear naca duct sections with the square resin blocks.
Roughing up area for better glue adhesion Its recommended to take a sanding file to rough up the are where the the resin turbo hump will be super glued on. This gives the super glue a roughed up surface to grab onto.
rear naca duct plugs glued into place Superglue the resin blocks into place.
Gluing resin turbo hump into place Super glue the resin turbo hump into place. Align into place before the glue sets-up.
Marking out locations for cutting out
Use an ink pen to mark out the section for the turbo hump area and mark the section of the top roof naca duct.
Superglue the top roof naca duct into place. If there is some gaps, there is no need to worry as you can fill these spots withApoxie-Sculpt, which that step will come later….
Optional side exhaust plug
This step is optional – if you don’t want to cut anymore off your body you can simply glue on the exhaust side plug on each side. But if you want the full replacement panels with vents, see the next step….
If you choose to add the whole square pannel with side vents, go ahead and mark the location that needs to be cut off. Use a razor saw to cut the two sides.
Superglue the side panels into place.
UseApoxie-Sculptto fill in any gaps on the attached resin parts. AddApoxie-Sculptinto the old naca duct hole that is part of the kit. Be sure to rough up the surface before addingApoxie-Sculptso it has something to adhere to. Theapoxie-sculptwill need 24 hours to cure properly and then it can be sanded down and leveled.
You also need to use Apoxie-Sculpt to fill in the tow-hook opening in the body as the 1986 and 1987 Lowenbrau Porsches didn't have an opening on the the front.
Sand all the bumps out smooth…..
Cut out a wedge of styrene to fit into the first section of the radiator exit and glue into place to make a “T” section in the radiator exit.
After the glue cures on the styrene wedge cut off flush and sand the top smooth.
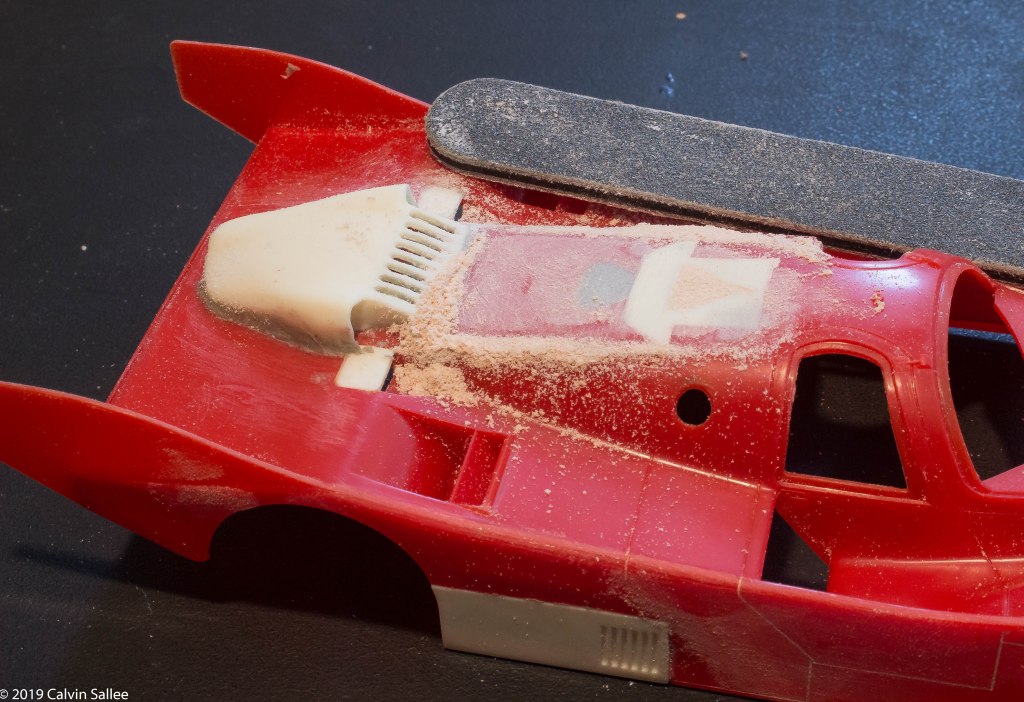
After leveling out and sanding theApoxie-Sculptthe entire body and any part of the kit that needs paint will require scuffing up the surface with ascotch brite padso the primer has a nice surface to adhere to and grab onto.
After you have a dull roughed up surface and all course sanding spots are finely sanded out. Wash your body and parts with Dawn dish washing soap and scrub. This will help take off any oil or contamination off the body so the primer will stick.
When the body is dry and clean, useTamiya grey primerin the modified areas of the body first. Adding primer shows any imprecations on your surface and most likely there will be some blemishes to fix. If there is an small hole or fine gap, useBondo sport fillerin the problem area. Use a dull x-acto knife to apply the filler. Let dry for about an hour and re-sand the surface until it looks smooth, then repeat the primer application until the blemishes are gone. This step is not necessarily exciting but is the most important to accomplish a desirable finish. A good finished paint job requires a lot of long and hard prep work.
When all the blemishes are all gone, useTamiya White Primerto eliminate any color bleed-through with the of the body and other parts. Adding theTamiya White Primerhelps theTamiya TS-26 Pure Whiteto have a nice white surface that will not effect the color of the red paint.Tamiya Lacquer paintsare very transparent and need a nice white surface to lay over.
The Decals
My favorite part of a racing car model build is the the decaling part. I prefer using Indycals decals whenever possible. The nice futures of Indycals decals is the are fresh, not too think or thick, easier to handle than a lot of decals, Indycals decals always works great withWalthers Solvaset decal setting solution. The white decals are actually WHITE when you apply them over any colored painted surface and have the least amount of transparency than any decal manufacture I know, especially kit decals!
Im decaling this body FIRST because I plant to clear coat over the decals with Model Masters or Testors Clear Lacquer. Indycals decals handle clear lacquer paint just fine, also the ‘hot’Tamiya TS-13 Clear. Im not usingTamiya TS-13on this build because after a decade of using Tamiya paints Ive noticed Tamiya TS-13 has the tendency to make red Tamiya ‘roll’ off , Im NOT talking about crinkle, but more like, ‘melt off’…it also does this with Tamiya Black and Florescent red.
The Wheels
When preparing the wheels for paint, I like to spray anything that requires chrome with a Flat Black base coat first. I gave the wheels a spray ofTamiya Matte Black.
My new love for Chrome paint is actually in pen form and that isMolotow Liqued Chrome pens, the chrome reflection is AMAZING! and in an easy to use pen form to where you have complete control. If there is any spots you cant fit the pen tip, you can quickly take a paint brush and move some of the paint in the hard to reach area and it doesn’t effect the chrome shine.
This conversion kit is for any of the1/24 Hasegawa or Revell Porsche 962C kitsand will replicate the 1986 24 hours of Daytona winning car of Al Holbert, Derek Bell, and Al Unser Jr.
You can purchase a conversion kit frommy website HERE… Easy checkout, you dont need any account, I accept Paypal and credit card. The kit comes with the proper turbo hump that was used in the 1986 24 Hours of Daytona, along with replacement side panels, naca roof duct, naca duct plugs, BBS wheels, and simple instructions.
The Donor kit you need
Any of the 1/24 Hasegawa or Revell Porsche 962c kits will work, even though each kit might have different wheels in the kit, thats doesn’t matter as our IMSA Porsche 962 conversion kit comes with BBS wheels
Indycalshas a beautifuldecal sheetfor this kit. Thesedecalsaccurately depict the winning car from the 1986 Daytona 24 hours
The build-up…..
I recommend usingGrey and White Tamiya lacquer Surface Primerfor this build. Its important to use lacquer on resin parts for best results. Its best to avoid enamel paints over resin parts at all cost. Unless you use lacquer primer as a base, you can apply enamel over lacquer paint.
The recommend color for this build: Tamiya TS-26 Prue Whitefor the overall body color
Sawing off tail end of the rear ground effect tunnels The first step is to cut of the last part of the under-tray to fit on the larger ground effect tunnels. Using a Razor saw, saw right on the leading edge of the rear bottom A-arm mounting point.
Superglue the ground effect tail end onto the plastic kit chassis. Be sure to use plenty of glue for a good weld
AddApoxie-Sculpt, if needed to fill-in any gap of ridge. Sand the bottom of the tunnels smooth after theApoxie-Sculptcures….
Test fitting and marking cutout section of turbo hump Test fit the turbo hump on the rear. The resin turbo hump has an indention of the naca duct underneath that will help align the turbo hump on-top of the body work. But, before gluing the turbo hump on-top of the bodywork, I recommend tracing out a section where the vents of the turbo hump is, to cut out an open section for a more realistic look. Not opening up this section inside of the turbo hump vent section will make for a tricky painting situation later on.
Grinding out rear naca ducts Using a Dremel, grind out the square raised part of the rear side naca ducts
rear naca duct resin plugs Test fit on the two rear naca duct sections with the square resin blocks.
Roughing up area for better glue adhesion Its recommended to take a sanding file to rough up the are where the the resin turbo hump will be super glued on. This gives the super glue a roughed up surface to grab onto.
rear naca duct plugs glued into place Superglue the resin blocks into place.
Gluing resin turbo hump into place Super glue the resin turbo hump into place. Align into place before the glue sets-up.
Marking out locations for cutting out
Use an ink pen to mark out the section for the turbo hump area and mark the section of the top roof naca duct.
Superglue the top roof naca duct into place. If there is some gaps, there is no need to worry as you can fill these spots withApoxie-Sculpt, which that step will come later….
Optional side exhaust plug
This step is optional – if you don’t want to cut anymore off your body you can simply glue on the exhaust side plug on each side. But if you want the full replacement panels with vents, see the next step….
If you choose to add the whole square pannel with side vents, go ahead and mark the location that needs to be cut off. Use a razor saw to cut the two sides.
Superglue the side panels into place.
UseApoxie-Sculptto fill in any gaps on the attached resin parts. AddApoxie-Sculptinto the old naca duct hole that is part of the kit. Be sure to rough up the surface before addingApoxie-Sculptso it has something to adhere to. Theapoxie-sculptwill need 24 hours to cure properly and then it can be sanded down and leveled.
You also need to use Apoxie-Sculpt to fill in the tow-hook opening in the body as the 1986 and 1987 Lowenbrau Porsches didn't have an opening on the the front.
Sand all the bumps out smooth…..
Cut out a wedge of styrene to fit into the first section of the radiator exit and glue into place to make a “T” section in the radiator exit.
After the glue cures on the styrene wedge cut off flush and sand the top smooth.
After leveling out and sanding theApoxie-Sculptthe entire body and any part of the kit that needs paint will require scuffing up the surface with ascotch brite padso the primer has a nice surface to adhere to and grab onto.
After you have a dull roughed up surface and all course sanding spots are finely sanded out. Wash your body and parts with Dawn dish washing soap and scrub. This will help take off any oil or contamination off the body so the primer will stick.
When the body is dry and clean, useTamiya grey primerin the modified areas of the body first. Adding primer shows any imprecations on your surface and most likely there will be some blemishes to fix. If there is an small hole or fine gap, useBondo sport fillerin the problem area. Use a dull x-acto knife to apply the filler. Let dry for about an hour and re-sand the surface until it looks smooth, then repeat the primer application until the blemishes are gone. This step is not necessarily exciting but is the most important to accomplish a desirable finish. A good finished paint job requires a lot of long and hard prep work.
When all the blemishes are all gone, useTamiya White Primerto eliminate any color bleed-through with the of the body and other parts. Adding theTamiya White Primerhelps theTamiya TS-26 Pure Whiteto have a nice white surface that will not effect the color of the red paint.Tamiya Lacquer paintsare very transparent and need a nice white surface to lay over.
The Decals
My favorite part of a racing car model build is the the decaling part. I prefer using Indycals decals whenever possible. The nice futures of Indycals decals is the are fresh, not too think or thick, easier to handle than a lot of decals, Indycals decals always works great withWalthers Solvaset decal setting solution. The white decals are actually WHITE when you apply them over any colored painted surface and have the least amount of transparency than any decal manufacture I know, especially kit decals!
Im decaling this body FIRST because I plant to clear coat over the decals with Model Masters or Testors Clear Lacquer. Indycals decals handle clear lacquer paint just fine, also the ‘hot’Tamiya TS-13 Clear. Im not usingTamiya TS-13on this build because after a decade of using Tamiya paints Ive noticed Tamiya TS-13 has the tendency to make red Tamiya ‘roll’ off , Im NOT talking about crinkle, but more like, ‘melt off’…it also does this with Tamiya Black and Florescent red.
The Wheels
When preparing the wheels for paint, I like to spray anything that requires chrome with a Flat Black base coat first. I gave the wheels a spray ofTamiya Matte Black.
My new love for Chrome paint is actually in pen form and that isMolotow Liqued Chrome pens, the chrome reflection is AMAZING! and in an easy to use pen form to where you have complete control. If there is any spots you cant fit the pen tip, you can quickly take a paint brush and move some of the paint in the hard to reach area and it doesn’t effect the chrome shine.
Decals: Decals available at Indycals HERE or You can buy the decal sheet, HERE. Decal sheet will be fulfilled by Indycals and will be shipped separately by Indycals
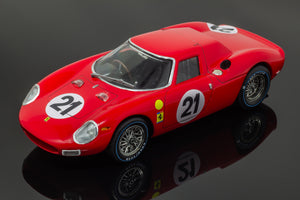
These step-by-step instructions will show you critical steps to convert the Academy Ferrari 250 LM plastic kit into a 1965 24 Hours of Lemans Winning Long Nose Ferrari 250 LM N.A.R.T winning #21 car
Take a black marker and mark the area on the bottom of the Academy Ferrari nose to grind out with a Dremel.
Sand down the front nose on the plastic kit to help attach the resin nose with superglue.
Bodywork
After the superglue dries, use a low grit sanding file to blend the edge between the new resin nose and the plastic kit. YOU DONT have to be perfect with this step, just get it close.
Add Apoxie-Sculpt to fill-in the seam between the resin nose and plastic body. Let Apoxie-Scultp cure for 24 hours.
Sand down the Apoxie-Sculpt as smooth as possible. Use a low grit sanding file and work up to a higher grit sand paper for smoother surface.
You DONT have to be perfect with this step, you have plenty of opportunity to get the surface smooth and perfect. Filling and sanding is a PROCESS, it easy, but takes time and isn't fun.
Its also important to take in consideration of the front headlights as that transition between resin and plastic CAN be problematic. Be sure to cut out and test fit the vac-u-forum windscreen to make sure the shape of the bodywork around the headlights is going to work in your favor.
Before you start shooting primer on the body, make sure to take the scuffing pad and rough up the surface of the plastic and resin nose. Clean and scuff and repeat until the shin is off the surface.
IMPORTANT! Take in consideration these next steps may take a few days of sanding, filling, priming and repeating until the surface is smooth and level.
Apply first coat of primer. YOU MUST use Lacquer primer on resin. NEVER EVER use enamel primer. If you dont know why your primer is, just dont use it. Spend the money and get something reliable like Tamiya grey Surface Primer and or Tamiya White surface Primer
Let primer dry 24 hours
Apply Bondo spot filler putty to any small hole or pin holes or rough areas.
Sand down the body filler until smooth and repeat the priming process, again and repeat steps over and over if needed.
This is the typical process for blending the bodywork together.
Painting
Before apply the red paint make sure to spray with Tamiya White Surface Primer.
YOU MUST use white primer before spraying the Tamiya TS-8 Italian Red Lacquer Spray paint.
Decaling
Decals are available from Indycals.net I highly Recommend using Walters Solvaset Decal setting solution with Indycals Decals
Make sure to apply this small Shell logo with open wheel racecar on the right side of the car.
After the Decals have dried for 24 hours, the option to apply clear coat over the decals which give a more realistic look on the car.
After clear coating using Tamiya Polish helps smooth the surface and give a shinny look. DO NOT rub Polish over the decals, it will DISTORY them.
Adding Details
Adding bare metal foil is the easiest way to add the chrome molding. I used the brand "Bare Metal Foil - Ultra Chrome"
Its easiest to cut of a large section of Bare Metal foil and just stick it over the entire area. Use your fingers to push down the surface and Q-tip to smooth out the wrinkles.
This part is going to take skills and calm emotions. Before you start make sure you glued in the headlights and paint the inside aluminum color.
Use small scissors to cutout the vac-u-form head light covers. Because of the nature of the headlight and everyone sculpting out this area little bit differently, I PURPPOSLY made the Vac-u-Form headlight covers larger to make sure its going to fit. YOUR JOB is to test fit and make sure the outer edge covers the outline of the headlights just right. Be sure to leave an edge of the clear cover as this will be needed to apply more chrome bare metal foil over. (read the next steps to understand better.)
I use CA glue on my Clear Vac-u-form parts but this is very risky and is not for everyone. I recommend using a glue you are comfortable with. Its also important that the clear head light covers are STRONG before applying the bare Metal foil on.
Apply a section Bare Metal foil onto the headlight covers. Just like on the window molding, I prefer the brand Bare Metal Foil - Ultra Chome.
Smooth out Bare Metal Foil with your fingers and a Q-tip.
If it doesn't look right, just rip it off and re-do it. This step is not easy. So dont feel bad if you are challenged.
Use the outline of the Clear vac-u-form headlight cover as a guide for using a new sharp X-acto knife to cut off the Bare Metal Foil.
This next step take a study hand and that is to use the x-acto knife to cut out the inside of bare Metal foil for the headlight cover.
Lower front nose lights
Be sure to sand these kit lights to make sure they fit. Depending how many coats of paint you use, this will effect how these fit in. So be sure to take your time and sand and fit. Paint the backs silver after done and super glue not the holes in the resin nose. and add Bare Metal Foil as a bracket.
Adding Panel Line color is a nice touch for the screen in the back.
Black Resin tires
I recommend spray painting these resin tires with Tamiya TS-82 Rubber Spray Paint and apply the Indycals Tire decals included on the sheet.
The finished kit
If you have any questions email me at info@classicracingresins.com
If you want to build the 1965 2nd Place Yellow Belgian Ferrari 250 LM, we have the decals and Black Resin tire upgrades, HERE
With an interval of just one week, the BPR circus landed in the federal capital for the second and last extra-championship stage, of the 2 hours from Brasilia
In Nelson Piquet's home, it would be no different that the Brazilian, alongside Johnny Ceccoto, achieved a great performance. With the Venezuelan starting the race, the team soon consolidated the lead in the race.
Half an hour into the race, Cecotto had an unusual problem in his "stint", when the nut on the front left wheel came loose, detaching the wheel from the hub. The Venezuelan had skill and calm to take the McLaren to the pits. The damage was reasonable, losing the lead and falling to tenth place. After the damage was addressed, Cecotto was making up the difference lap by lap. He did very well and handed the car over to Nelson Piquet, at the pit stop, leading the race.
From then on, he managed to lead the race, taking advantage of McLaren's V12 BMW engine, to receive the flag and take the second victory in Brazil.
Correcting the ride height issue Take the Front and rear hub/brake assembly and simplify super glue them onto the a-arms of the kit. Just make sure they are square to the overall chassis and just like that the ride height problem is fix.
Tires We are using Indycals 1/24 scale Michelin tires with the black background it makes it way easier to handle. But the key is using Walthers Solveset decal solution. I simply cut out the tire decal and apply it to the tire and then apply the decal solution and let it sit for about 7 mins and take an old t-shirt and dab the decal down to the surface and it will start conforming to the sidewall of the tire. The decal solution softens up the decal and helps “iron out” the wrinkles.
This is why I like the Indycals tire decals. Especially on rubber kit tires, where “silvering” often happens when the clear carrier film around the graphics or letters can be seen. The black carrier film of the Indycals tire decals hides any “silvering” that may occur. I just applied the Indycals 1/24 scale Michelin tires. I also used Walthers Solvaset Decal solution to help lay the decals snug and flat. You can buy the Michelin tire decals here
I recommend using Tamiya TS-82 Rubber Black and after the Indycals tire decals are applied spray Tamiya TS-80 Flat Clear to seal the decal and give the proper rubber look.
We recommend using Tamiya lacquer surface primer on all resin surfaces. DO NOT use enamels on resin.
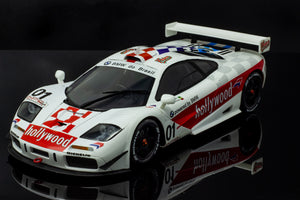
Bodywork I order to build a proper Hollywood McLaren you MUST use the resin hood no matter what Fujimi McLaren you are using as even on the BPR Zhuhai version the hood is NOT accurate as seen in the picture bellow. The Kit hood is not sharp like the real hood.
Use the flat part and super glue onto the top of the hood
The Hollywood Mclaren uses the roof scoop.
in 1996 the Bigazzi Team cars didn't have the front part of the side skirt and it was a rounded side surface.
Try your best to cut off the skirt and take the sanding file and round the surface, but don't be surprised the plastic splits and then you will have to use Apoxie sculpt and fill inside.
Panting instructions
Be sure to fill and clean your resin fenders. I don not use mold release in my molds but the resin still can pick up some oil contamination from the silicone rubber mold. Soaking in tire bleach or spray and rinse down with oven clean works well. Also when sanding the surface of the resin its recommended to use Dawn dish washing soap as that helps get any possible grease off
Use Tamiya Grey Primer to find any imperfections that might be on the body. That is the main reason for applying primer is to help find any problem areas and to give the color coats a nice base to adhere to.
Its always important to test fit any model you build. every model fits slightly different and every part that is glued on is not exactly correct and those slight variations add up. So always test fit before you start painting any model.
After apply coats of grey primer, I prefer to give the body a couple coast of Tamiya White primer. When using Tamiya spray paints, its important to use a white base, because Tamiya spray paints are very thin and translucent. After the white Primer is cured, Apply Tamiya TS-26 Pure White.
Applying decals
Use Walters Solvaset for applying the Indycals decals. Which can be purchased HERE. After applying the decals I would HIGHLY recommend clear coating over the decals. Testors Lacquer Clear coat is a good safe clear coat, Tamiya TS-13 also works but and be a little ‘Hot” so be careful.
After all those steps its just a matter of following the kit instructions until the end.
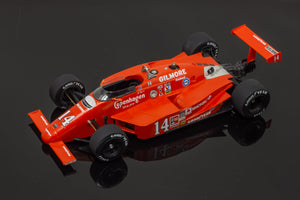
-Body -Undertray -Clear Windscreen A1 – Cockpit A2 – Transaxle A3 – Seat A4 – Brake Disc A5 – Dash A6 – Rear Wing Strut Mount A7 – Steering Wheel A8 – Right Front Wing A9 – Left Front Wing A10 – Left Radiator A11 – Right Radiator A12 – Rear Wing Strut A49 – Rear Wheel Nuts A50 – Pop Off Valve A51 – Mirrors A52 – Front Wheel nuts A53 – Turbo Inlet F17 – Foyt Rear Wing F18 – Foyt Right Rear Wing Endplate F19 – Foyt Left Rear Wing Endplate
B23 – Rear Tires B24 – Front Tires B25 – Rear Wheels B26 – Front Wheels M31 – RIGHT Rear Lower Wishbone M32 – LEFT Rear Lower Wishbone M33 – RIGHT Front Lower Wishbone M34 – Left Front Lower Wishbone M35 – RIGHT Front Upper Wishbone M36 – LEFT Front Upper Wishbone M37 – Rear Upper Suspension M38 – LEFT Rear Hub M39 – RIGHT Rear Hub M40 – LEFT Front Hub M41 – RIGHT Front Hub M42 – Rollover Hoop M43 – Fuel Inlet M44 – Exhaust M45 – Steering Rod Sleave M46- Pull Rods M47- Steering Rod M48 – Rear Axle
Part 1 – Clean up
Be sure to fill and clean your resin parts. I do not use mold release in my molds, but the resin still can pick up some oil contamination from the silicone rubber mold. Soaking in tire bleach or spray and rinse down with oven clean works well. Also, when sanding the surface of the resin its recommended to use Dawn dish washing soap as that helps get any possible grease off Wash and soak all resin parts in Tire Bleach overnight. This will remove all contamination/oil off the resin. After the Tire Bleach Bath, use a scratch pad and scuff up the entire surface to clean and scratch up the surface for proper Primer adhesion. Using a high grit sandpaper to clean up and scratch up the surface is also recommended. Failing to clean the surface will result in paint not adhering or paint reaction. Fill in any pin holes or air bubbles in the resin with putty or Bondo Spot filler and sand smooth. This is the most important part of the build.
Step 2 – Buildup
-Drill out the center of the Transaxle with a #52 0.063” Drill bit -Drill out the hole for the steering rod sleeve with a #52 0.063” Drill bit
-Paint the Undertray with Tamiya TS-29 Semi-Gloss Black -Paint (A2) Transaxle with Tamiya TS-35 Gunmetal -Insert Brass (M48) Rear Axle into drilled hole of (A2) Transaxle -Superglue the (A2) Transaxle onto the Undertray.
Glue on the following parts illustrated below
The white metal suspension parts need to be polished with steel wool or a soft brass wire wheel as the Penske Cars had Chrome suspension
Paint (A1) cockpit with Tamiya TS-29 Semi-Gloss Black Paint (A3) Seat with Tamiya TS-6 Matt Black Paint (A5) Dash with Aluminum and TS-29 Semi Gloss Black Glue Seat and Dash into place
Step 3 - Body
Superglue Front wings onto the nose, be sure to test fit and develop a plan on how you are going to attach them properly.
Add a light coat of Tamiya Grey Surface Primer Check for imperfections, sand, fill, sand, fill, and repeat Add light coats of Grey Primer until all imperfection are gone.
Add light coats of Tamiya White Surface Primer After Primer dries. Lightly sand smooth with high grit sandpaper.
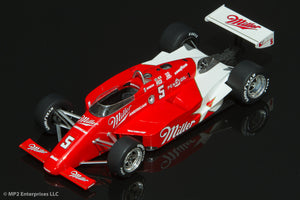
paint Body with Mustang Poppy Red. Spray 3 coats First coat spray light and get all the hard to spray spots first. Let sit for 1 hour Second coat, makes it a little heavier, let sit for 1 hour Last coat, spray heavy and then let dry for 48 hrs
Step 4 Wheels and Tires
Drill out rear wheel with #52 0.063” Drill bit Paint the wheels Semi Gloss Black
Sand and Clean up the black Resin tires then spray Tamiya TS-32 Rubber on them. Apply Indycals tire decals and use Solveset Decal solution to soften and help the decals conform to the curvature of the tire.
Step 5 Rear Wing and Front suspension
Paint rear wing assembly Mustang Poppy Red. Glue the (A12) Rear Wing Strut onto the (F17) Rear Wing. Then Glue on the (F18 and F19) Rear Wing Endplates onto Rear Wing Before Gluing on the suspension parts, insert (M45) Steering Rod Sleeve though the front nose.
Glue on the following parts illustrated below
Step 6 Other parts and Windscreen
Before gluing the Undertray onto the body. Attach A10, A11, M44, and A53. Next, Superglue the cockpit into the body. Then superglue the Undertray onto the bottom of body
Superglue on the (M42) Rollover Hoop and the (M43) Fuel Inlet. Using small scissors cut out the Vac-u-form Clear Windscreen and attach it with windscreen/canopy glue or CA Glue (risky)
Use a small dab of CA Glue to attach the (A52) Mirrors to the side of the windscreen
Attach wheels to the hubs and glue on the (A49) Rear Wheel nuts and (A52) Front Wheel Nuts
-Body -Undertray -Clear Windscreen A1 – Cockpit A2 – Transaxle A3 – Seat A4 – Brake Disc A5 – Dash A6 – Rear Wing Strut Mount A7 – Steering Wheel A8 – Right Front Wing A9 – Left Front Wing A10 – Left Radiator A11 – Right Radiator A12 – Rear Wing Strut A49 – Rear Wheel Nuts A50 – Pop Off Valve A51 – Mirrors A52 – Front Wheel nuts A53 – Turbo Inlet R14 – Rahal Rear Wing R15 – Rahal Right Rear Wing Endplate R16 – Rahal Left Rear Wing Endplate
B23 – Rear Tires B24 – Front Tires B25 – Rear Wheels B26 – Front Wheels M31 – RIGHT Rear Lower Wishbone M32 – LEFT Rear Lower Wishbone M33 – RIGHT Front Lower Wishbone M34 – Left Front Lower Wishbone M35 – RIGHT Front Upper Wishbone M36 – LEFT Front Upper Wishbone M37 – Rear Upper Suspension M38 – LEFT Rear Hub M39 – RIGHT Rear Hub M40 – LEFT Front Hub M41 – RIGHT Front Hub M42 – Rollover Hoop M43 – Fuel Inlet M44 – Exhaust M45 – Steering Rod Sleave M46- Pull Rods M47- Steering Rod M48 – Rear Axle
Part 1 – Clean up
Be sure to fill and clean your resin parts. I do not use mold release in my molds, but the resin still can pick up some oil contamination from the silicone rubber mold. Soaking in tire bleach or spray and rinse down with oven clean works well. Also, when sanding the surface of the resin its recommended to use Dawn dish washing soap as that helps get any possible grease off Wash and soak all resin parts in Tire Bleach overnight. This will remove all contamination/oil off the resin. After the Tire Bleach Bath, use a scratch pad and scuff up the entire surface to clean and scratch up the surface for proper Primer adhesion. Using a high grit sandpaper to clean up and scratch up the surface is also recommended. Failing to clean the surface will result in paint not adhering or paint reaction. Fill in any pin holes or air bubbles in the resin with putty or Bondo Spot filler and sand smooth. This is the most important part of the build.
Step 2 – Buildup
-Drill out the center of the Transaxle with a #52 0.063” Drill bit -Drill out the hole for the steering rod sleeve with a #52 0.063” Drill bit
-Paint the Undertray with Tamiya TS-29 Semi-Gloss Black -Paint (A2) Transaxle with Tamiya TS-35 Gunmetal -Insert Brass (M48) Rear Axle into drilled hole of (A2) Transaxle -Superglue the (A2) Transaxle onto the Undertray.
Glue on the following parts illustrated below
The white metal suspension parts need to be polished with steel wool or a soft brass wire wheel as the Penske Cars had Chrome suspension
Paint (A1) cockpit with Tamiya TS-29 Semi-Gloss Black Paint (A3) Seat with Tamiya TS-6 Matt Black Paint (A5) Dash with Aluminum and TS-29 Semi Gloss Black Glue Seat and Dash into place
Step 3 - Body
Superglue Front wings onto the nose, be sure to test fit and develop a plan on how you are going to attach them properly.
Add a light coat of Tamiya Grey Surface Primer Check for imperfections, sand, fill, sand, fill, and repeat Add light coats of Grey Primer until all imperfection are gone.
Add light coats of Tamiya White Surface Primer After Primer dries. Lightly sand smooth with high grit sandpaper.
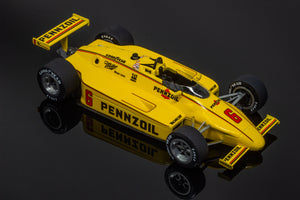
paint Body with Tamiya TS-8 Italian Red. Spray 3 coats First coat spray light and get all the hard to spray spots first. Let sit for 1 hour Second coat, makes it a little heavier, let sit for 1 hour Last coat, spray heavy and then let dry for 48 hrs
Step 4 Wheels and Tires
Drill out rear wheel with #52 0.063” Drill bit Paint the wheels Semi Gloss Black
Sand and Clean up the black Resin tires then spray Tamiya TS-32 Rubber on them. Apply Indycals tire decals and use Solveset Decal solution to soften and help the decals conform to the curvature of the tire.
Step 5 Rear Wing and Front suspension
Paint rear wing assembly Tamiya TS8. Glue the (A12) Rear Wing Strut onto the (F17) Rear Wing. Then Glue on the (F18 and F19) Rear Wing Endplates onto Rear Wing Before Gluing on the suspension parts, insert (M45) Steering Rod Sleeve though the front nose.
Glue on the following parts illustrated below
Step 6 Other parts and Windscreen
Before gluing the Undertray onto the body. Attach A10, A11, M44, and A53. Next, Superglue the cockpit into the body. Then superglue the Undertray onto the bottom of body
Superglue on the (M42) Rollover Hoop and the (M43) Fuel Inlet. Using small scissors cut out the Vac-u-form Clear Windscreen and attach it with windscreen/canopy glue or CA Glue (risky)
Use a small dab of CA Glue to attach the (A52) Mirrors to the side of the windscreen
Attach wheels to the hubs and glue on the (A49) Rear Wheel nuts and (A52) Front Wheel Nuts
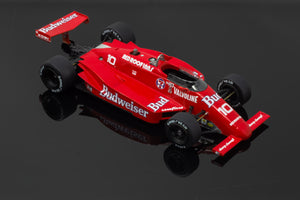
-Body -Undertray -Clear Windscreen A1 – Cockpit A2 – Transaxle A3 – Seat A4 – Brake Disc A5 – Dash A6 – Rear Wing Strut Mount A7 – Steering Wheel A8 – Right Front Wing A9 – Left Front Wing A10 – Left Radiator A11 – Right Radiator A12 – Rear Wing Strut A49 – Rear Wheel Nuts A50 – Pop Off Valve A51 – Mirrors A52 – Front Wheel nuts A53 – Turbo Inlet P20 – Penske Rear Wing P21 – Penske Left Rear Wing Endplate P22 – Penske Right Rear Wing Endplate
C27 – Rear Tires C28 – Front Tires C29 – Rear Wheels M31 – RIGHT Rear Lower Wishbone M32 – LEFT Rear Lower Wishbone M33 – RIGHT Front Lower Wishbone M34 – Left Front Lower Wishbone M35 – RIGHT Front Upper Wishbone M36 – LEFT Front Upper Wishbone M37 – Rear Upper Suspension M38 – LEFT Rear Hub M39 – RIGHT Rear Hub M40 – LEFT Front Hub M41 – RIGHT Front Hub M42 – Rollover Hoop M43 – Fuel Inlet M44 – Exhaust M45 – Steering Rod Sleave M46- Pull Rods M47- Steering Rod M48 – Rear Axle
Part 1 – Clean up
Be sure to fill and clean your resin parts. I do not use mold release in my molds, but the resin still can pick up some oil contamination from the silicone rubber mold. Soaking in tire bleach or spray and rinse down with oven clean works well. Also, when sanding the surface of the resin its recommended to use Dawn dish washing soap as that helps get any possible grease off Wash and soak all resin parts in Tire Bleach overnight. This will remove all contamination/oil off the resin. After the Tire Bleach Bath, use a scratch pad and scuff up the entire surface to clean and scratch up the surface for proper Primer adhesion. Using a high grit sandpaper to clean up and scratch up the surface is also recommended. Failing to clean the surface will result in paint not adhering or paint reaction. Fill in any pin holes or air bubbles in the resin with putty or Bondo Spot filler and sand smooth. This is the most important part of the build.
Step 2 – Buildup
-Drill out the center of the Transaxle with a #52 0.063” Drill bit -Drill out the hole for the steering rod sleeve with a #52 0.063” Drill bit
-Paint the Undertray with Tamiya TS-29 Semi-Gloss Black -Paint (A2) Transaxle with Tamiya TS-35 Gunmetal -Insert Brass (M48) Rear Axle into drilled hole of (A2) Transaxle -Superglue the (A2) Transaxle onto the Undertray.
Glue on the following parts illustrated below
The white metal suspension parts need to be polished with steel wool or a soft brass wire wheel as the Penske Cars had Chrome suspension
Paint (A1) cockpit with Tamiya TS-29 Semi-Gloss Black Paint (A3) Seat with Tamiya TS-6 Matt Black Paint (A5) Dash with Aluminum and TS-29 Semi Gloss Black Glue Seat and Dash into place
Step 3 - Body
Superglue Front wings onto the nose, be sure to test fit and develop a plan on how you are going to attach them properly.
Add a light coat of Tamiya Grey Surface Primer Check for imperfections, sand, fill, sand, fill, and repeat Add light coats of Grey Primer until all imperfection are gone.
Add light coats of Tamiya White Surface Primer After Primer dries. Lightly sand smooth with high grit sandpaper.
Mask off the rear of the body
Make sure to study how the decals are designed to make sure the masking line is correct.
paint Body with Tamiya TS26 Pure white and Tamiya TS-8 Italian Red. Spray 3 coats First coat spray light and get all the hard to spray spots first. Let sit for 1 hour Second coat, makes it a little heavier, let sit for 1 hour Last coat, spray heavy and then let dry for 48 hrs
Step 4 Wheels and Tires
Drill out rear wheel with #52 0.063” Drill bit Paint the wheels Semi Gloss Black
Sand and Clean up the black Resin tires then spray Tamiya TS-32 Rubber on them. Apply Indycals tire decals and use Solveset Decal solution to soften and help the decals conform to the curvature of the tire.
Step 5 Rear Wing and Front suspension
Paint rear wing assembly Tamiya TS26. Glue the (A12) Rear Wing Strut onto the (F17) Rear Wing. Then Glue on the (F18 and F19) Rear Wing Endplates onto Rear Wing Before Gluing on the suspension parts, insert (M45) Steering Rod Sleeve though the front nose.
Glue on the following parts illustrated below
Step 6 Other parts and Windscreen
Before gluing the Undertray onto the body. Attach A10, A11, M44, and A53. Next, Superglue the cockpit into the body. Then superglue the Undertray onto the bottom of body
Superglue on the (M42) Rollover Hoop and the (M43) Fuel Inlet. Using small scissors cut out the Vac-u-form Clear Windscreen and attach it with windscreen/canopy glue or CA Glue (risky)
Use a small dab of CA Glue to attach the (A52) Mirrors to the side of the windscreen
Attach wheels to the hubs and glue on the (A49) Rear Wheel nuts and (A52) Front Wheel Nuts


 Marking out locations for cutting out