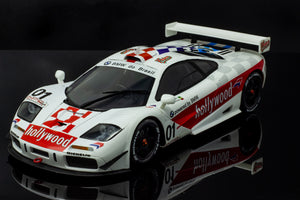
With an interval of just one week, the BPR circus landed in the federal capital for the second and last extra-championship stage, of the 2 hours from Brasilia
In Nelson Piquet's home, it would be no different that the Brazilian, alongside Johnny Ceccoto, achieved a great performance. With the Venezuelan starting the race, the team soon consolidated the lead in the race.
Half an hour into the race, Cecotto had an unusual problem in his "stint", when the nut on the front left wheel came loose, detaching the wheel from the hub. The Venezuelan had skill and calm to take the McLaren to the pits. The damage was reasonable, losing the lead and falling to tenth place. After the damage was addressed, Cecotto was making up the difference lap by lap. He did very well and handed the car over to Nelson Piquet, at the pit stop, leading the race.
From then on, he managed to lead the race, taking advantage of McLaren's V12 BMW engine, to receive the flag and take the second victory in Brazil.
In order to build a proper 1996 Hollywood car you need to purchase either the:
-1/24 Fujimi Mclaren F1 GTR Short Tail - Lemans 1995 #59 Ueno Clinic
-1/24 Fujimi Mclaren F1 GTR Short Tail - Lemans 1995 #24 Gulf
-1/24 Fujimi Mclaren F1 GTR Short Tail - Lemans 1995 #49 West FM
-1/24 Fujimi Mclaren F1 GTR Short Tail - BPR Zhuhai 1996 #6 "Smoking Cowboy"
Correcting the ride height issue
Take the Front and rear hub/brake assembly and simplify super glue them onto the a-arms of the kit. Just make sure they are square to the overall chassis and just like that the ride height problem is fix.

Tires
We are using Indycals 1/24 scale Michelin tires with the black background it makes it way easier to handle. But the key is using Walthers Solveset decal solution. I simply cut out the tire decal and apply it to the tire and then apply the decal solution and let it sit for about 7 mins and take an old t-shirt and dab the decal down to the surface and it will start conforming to the sidewall of the tire. The decal solution softens up the decal and helps “iron out” the wrinkles.
This is why I like the Indycals tire decals. Especially on rubber kit tires, where “silvering” often happens when the clear carrier film around the graphics or letters can be seen. The black carrier film of the Indycals tire decals hides any “silvering” that may occur. I just applied the Indycals 1/24 scale Michelin tires. I also used Walthers Solvaset Decal solution to help lay the decals snug and flat. You can buy the Michelin tire decals here
I recommend using Tamiya TS-82 Rubber Black and after the Indycals tire decals are applied spray Tamiya TS-80 Flat Clear to seal the decal and give the proper rubber look.

We recommend using Tamiya lacquer surface primer on all resin surfaces. DO NOT use enamels on resin.

Bodywork
I order to build a proper Hollywood McLaren you MUST use the resin hood no matter what Fujimi McLaren you are using as even on the BPR Zhuhai version the hood is NOT accurate as seen in the picture bellow. The Kit hood is not sharp like the real hood.


Use the flat part and super glue onto the top of the hood

The Hollywood Mclaren uses the roof scoop.

in 1996 the Bigazzi Team cars didn't have the front part of the side skirt and it was a rounded side surface.

Try your best to cut off the skirt and take the sanding file and round the surface, but don't be surprised the plastic splits and then you will have to use Apoxie sculpt and fill inside.

Panting instructions
Be sure to fill and clean your resin fenders. I don not use mold release in my molds but the resin still can pick up some oil contamination from the silicone rubber mold. Soaking in tire bleach or spray and rinse down with oven clean works well. Also when sanding the surface of the resin its recommended to use Dawn dish washing soap as that helps get any possible grease off
Use Tamiya Grey Primer to find any imperfections that might be on the body. That is the main reason for applying primer is to help find any problem areas and to give the color coats a nice base to adhere to.
Its always important to test fit any model you build. every model fits slightly different and every part that is glued on is not exactly correct and those slight variations add up. So always test fit before you start painting any model.
After apply coats of grey primer, I prefer to give the body a couple coast of Tamiya White primer. When using Tamiya spray paints, its important to use a white base, because Tamiya spray paints are very thin and translucent. After the white Primer is cured, Apply Tamiya TS-26 Pure White.
Applying decals
Use Walters Solvaset for applying the Indycals decals. Which can be purchased HERE. After applying the decals I would HIGHLY recommend clear coating over the decals. Testors Lacquer Clear coat is a good safe clear coat, Tamiya TS-13 also works but and be a little ‘Hot” so be careful.
After all those steps its just a matter of following the kit instructions until the end.


