
Introduction
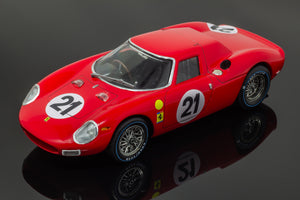
These step-by-step instructions will show you critical steps to convert the Academy Ferrari 250 LM plastic kit into a 1965 24 Hours of Lemans Winning Long Nose Ferrari 250 LM N.A.R.T winning #21 car
You can buy this conversion kit HERE on this website

Which kit to buy?
Any of the three different Boxes of the 1/24 Academy Ferrari 250 LM kits work, they are the same in all respects beside the decals.
You can find these kits HERE on ebay.


Modifications
Take a black marker and mark the area on the bottom of the Academy Ferrari nose to grind out with a Dremel.


Sand down the front nose on the plastic kit to help attach the resin nose with superglue.
Bodywork

After the superglue dries, use a low grit sanding file to blend the edge between the new resin nose and the plastic kit. YOU DONT have to be perfect with this step, just get it close.

Add Apoxie-Sculpt to fill-in the seam between the resin nose and plastic body. Let Apoxie-Scultp cure for 24 hours.

Sand down the Apoxie-Sculpt as smooth as possible. Use a low grit sanding file and work up to a higher grit sand paper for smoother surface.
You DONT have to be perfect with this step, you have plenty of opportunity to get the surface smooth and perfect. Filling and sanding is a PROCESS, it easy, but takes time and isn't fun.

Its also important to take in consideration of the front headlights as that transition between resin and plastic CAN be problematic. Be sure to cut out and test fit the vac-u-forum windscreen to make sure the shape of the bodywork around the headlights is going to work in your favor.
Before you start shooting primer on the body, make sure to take the scuffing pad and rough up the surface of the plastic and resin nose. Clean and scuff and repeat until the shin is off the surface.
IMPORTANT! Take in consideration these next steps may take a few days of sanding, filling, priming and repeating until the surface is smooth and level.

Apply first coat of primer. YOU MUST use Lacquer primer on resin. NEVER EVER use enamel primer. If you dont know why your primer is, just dont use it. Spend the money and get something reliable like Tamiya grey Surface Primer and or Tamiya White surface Primer

Let primer dry 24 hours

Apply Bondo spot filler putty to any small hole or pin holes or rough areas.

Sand down the body filler until smooth and repeat the priming process, again and repeat steps over and over if needed.
This is the typical process for blending the bodywork together.
Painting
Before apply the red paint make sure to spray with Tamiya White Surface Primer.
YOU MUST use white primer before spraying the Tamiya TS-8 Italian Red Lacquer Spray paint.

Decaling
Decals are available from Indycals.net I highly Recommend using Walters Solvaset Decal setting solution with Indycals Decals


Make sure to apply this small Shell logo with open wheel racecar on the right side of the car.
![]()
After the Decals have dried for 24 hours, the option to apply clear coat over the decals which give a more realistic look on the car.

After clear coating using Tamiya Polish helps smooth the surface and give a shinny look. DO NOT rub Polish over the decals, it will DISTORY them.
Adding Details
Adding bare metal foil is the easiest way to add the chrome molding. I used the brand "Bare Metal Foil - Ultra Chrome"

Its easiest to cut of a large section of Bare Metal foil and just stick it over the entire area. Use your fingers to push down the surface and Q-tip to smooth out the wrinkles.

Attaching Vac-U-Form headlight covers (Very difficult!)
This part is going to take skills and calm emotions. Before you start make sure you glued in the headlights and paint the inside aluminum color.
Use small scissors to cutout the vac-u-form head light covers. Because of the nature of the headlight and everyone sculpting out this area little bit differently, I PURPPOSLY made the Vac-u-Form headlight covers larger to make sure its going to fit. YOUR JOB is to test fit and make sure the outer edge covers the outline of the headlights just right. Be sure to leave an edge of the clear cover as this will be needed to apply more chrome bare metal foil over. (read the next steps to understand better.)

I use CA glue on my Clear Vac-u-form parts but this is very risky and is not for everyone. I recommend using a glue you are comfortable with. Its also important that the clear head light covers are STRONG before applying the bare Metal foil on.

Apply a section Bare Metal foil onto the headlight covers. Just like on the window molding, I prefer the brand Bare Metal Foil - Ultra Chome.

Smooth out Bare Metal Foil with your fingers and a Q-tip.
If it doesn't look right, just rip it off and re-do it. This step is not easy. So dont feel bad if you are challenged.

Use the outline of the Clear vac-u-form headlight cover as a guide for using a new sharp X-acto knife to cut off the Bare Metal Foil.
This next step take a study hand and that is to use the x-acto knife to cut out the inside of bare Metal foil for the headlight cover.
Lower front nose lights
Be sure to sand these kit lights to make sure they fit. Depending how many coats of paint you use, this will effect how these fit in. So be sure to take your time and sand and fit. Paint the backs silver after done and super glue not the holes in the resin nose. and add Bare Metal Foil as a bracket.


Adding Panel Line color is a nice touch for the screen in the back.
Black Resin tires
I recommend spray painting these resin tires with Tamiya TS-82 Rubber Spray Paint and apply the Indycals Tire decals included on the sheet.
The finished kit

If you have any questions email me at info@classicracingresins.com
If you want to build the 1965 2nd Place Yellow Belgian Ferrari 250 LM, we have the decals and Black Resin tire upgrades, HERE
