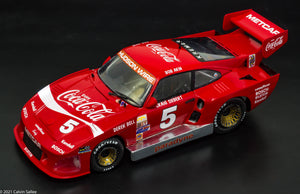
This blog post reviews and shows how to properly convert the 1/24 scale NuNu Porsche 935 K3 kit into the 1982 Coca-Cola Akin Racing Porsche 935 K3 Daytona 24 hour version. The NuNu kit came out December 2019 as the 1979 #41 Kremer Porsche 935 K3 -24 hours of Le-Mans race winner, this was very exciting news to me as a model builder and businessman because there’s endless possibilities of K3’s that can be created from this NuNu kit. I have many conversion kits planed for this K3 kit. This blog will show how to accurately convert this kit into the 1982 Coke K3.
The 1982 Akin Racing Porsche 935 K3 – aka “Lady” was built in 1980 and had a long and storied history. Prior to racing at Daytona in 1982, it was campaigned in early 1981 by Bob Wollek with Jagermeister livery, but was sold to Akin just before Le Mans in 1981. The car was upgraded after Lemans with new side skirts and modifications to the nose and rear wing leading up to the 1982 Daytona 24 hours. Bob Akin, Derek Bell, and Craig Seibert battled back to finish second place after Akin spun in turn 1 during the night, hitting the guardrail that damaged the right quarter panel and knocked the brake out of adjustment. Akin would continue to racing this chassis up until the end of 1983.
The conversion kit
You can buy a conversion kit HERE

This conversion kit comes with:
2 Resin Fenders
2 Resin side skirts
1 Resin Hood radiator hood outlet
1 Resin Top Nose Extension
2 Resin Rear Wing Endplates
The kit needed
You can buy the donor kit off ebay, using my ebay affiliate link HERE

The Decal sheet
The decal sheet can be purchased from Indycals HERE


Converting the NuNu kit

Be sure to fill and clean your resin parts. I don not use mold release in my molds but the resin still can pick up some oil contamination from the silicone rubber mold. Soaking in tire bleach or spray and rinse down with oven clean works well. Also when sanding the surface of the resin its recommended to use Dawn dish washing soap as that helps get any possible grease off
Converting Front nose and fenders

Using the Dremel grind out the front part of the hood, use the resin hood exit part to measure the size of the square opening needed to cutout the hood.
Then use Apoxie Sculpt to fill in the first 8 louvers on the front fenders

Super glue in the hood insert piece and sand down the apoxie sculpt on the louvers

Sand the gaps between the resin insert and plastic flush…

Fill the gaps with Apoxie Sculpt and or Bondo spot filler

I recommend using Tamiya grey Surface primer the front part of the hood before the next step. Add more filler and prime more if needed, until surface is smooth.

Then Super glue on the top nose piece and sand flush with the other surfaces and fill if needed with filler.
Side Skirts

Saw off the original side skirts with a razor saw

Use cutters to make the process easier too.

Sand the freshly cut surface with a file

Superglue on the resin side skirts. This part is kind of tricky, take your time and try to hold it in a way to keep the skirts straight until the glue sets up.


After the resin side skirts are cured, super glue the fenders on. This will require some test fitting and adjustments. Take your time as there is a lot of spots that need to line up just right to make these fenders fit properly. Don’t hesitate to do some grinding and sanding to makes this all fit.
Converting the Back Bumper
Use Apoxie Sculpt to fill in the back bumper indentions as on the Akin car didn’t have any, just a flat rear bumper, as seen in the picture below.


Sand down the Apoxie Sculpt with a file.
Use and fine grit file to smooth out the bumper. Then sand and scuff the rest of the car to prepare for primer.
Painting

Use Tamiya Grey Primer to find any imperfections that might be on the body. That is the main reason for applying primer is to help find any problem areas and to give the color coats a nice base to adhere to.
After apply coats of grey primer, I prefer to give the body a couple coast of Tamiya White primer. When using Tamiya spray paints, its important to use a white base, because Tamiya spray paints are very thin and translucent. After the white Primer is cured, Apply Tamiya TS-8 Italian Red


You can paint the side skirts aluminum or do what I did and use Bare Metal Foil

Decaling

Use Walters Solvaset for applying the Indycals decals.
After applying the decals I would HIGHLY recommend clear coating over the decals. Testors Lacquer Clear coat is a good safe clear coat, Tamiya TS-13 also works but and be a little ‘Hot” so be careful.
After all those steps its just a matter of following the kit instructions until the end.
The Final product
This was an enjoyable build. The NuNu kit was very straight forward and built very well. Thank you to Indycals for working with me to make this 1982 Coke K3 possible.


