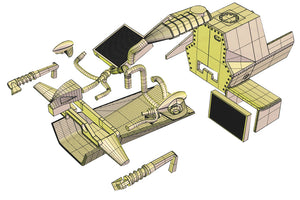
This blog will show the step-by-step process of upgrading the 1/25 AMT Cummins March 86c with the 3d designed Indycals kit.
As Indy car modelers, we are fortunate that AMT released a 1/25 scale March 86C kit in the form of Al Unser’s 1987 winning car. The kit, however, leaves a lot to be desired. There is only the top half of the tub (which is incorrect) no radiator detail, incorrect rear suspension, and part of the undertray is missing. This kit provides the parts to correct the flaws in the AMT kit such as:
-Correct tub
-the missing part of the undertray
-Radiator
-Oil cooler
-new exhaust parts
-new turbocharger plenum
-new turbocharger
-near upper rear suspension
-new rear shocks
-new GEARBOX
-Indycals decal sheet with Goodyear tire decals
You can buy the Upgrade kits here on my website
You can find the 1/25 AMT Cummins March 86c here on ebay


1987 Cummins March 86c parts

1986 Budweiser March 86c Parts

1986 Copenhagen March 86c Parts
Chassis Modifications

Glue in the radiator grills onto the side pods

Glue the top and bottom half of the main chassis together as the AMT directions show.

Use a razor saw to cut the AMT fuel tank off the back of the cockpit/seat area

Push the cockpit into the inside of the chassis

Push until it stops

Push fuel tank into place behind the cockpit

Make sure the back lip of the fuel cell is overlapping the rear part of the AMT tub area floor

Superglue the rear engine pan to the AMT chassis

Make sure to test fit before gluing
Drivetrain

Use a razor saw and cut on the red highlighted line to cut off the AMT Trans-axle as shown in the picture above.

Use the razor saw to cut off the AMT Trans-axle

Use Loctite Super Glue to attach the resin Trans-axle to the AMT Cosworth Engine

Drill out the trans-axle to install the rear axle. Use a Pin vise drill with a 0.098″ drill bit

Take the rear axle and sand down the center area flush with the rest of the axle


Test fit axle after drilling out the gearbox
Suspension

Use a razor saw to cut off the front suspension arms off the body.

Cut completely off flush with the body

Use a pin vise drill with a 0.026″ drill bit to drill out the center of where the suspension parts use to be attached

Use a pin vise drill with a 0.026″ drill bit to drill out holes on the ends of the cut-off suspension parts

Super glue 0.020″ Brass rod into the drilled-out ends of the suspension arms supplied in the kit.

Take the lower wishbones and cut off the area highlighted in red

Cut off the areas highlighted in red on the top rear wishbones.

Glue on the lower wishbone suspension to the bottom of the drivetrain and level out using the axel as a guide.

Use a square file and sand down the two areas as shown in the picture above to properly make the rocker-arm suspension fit properly

Attach the rocker arms to the top of the drivetrain and test fit before gluing

Glue on the Turbo and plenum. Make sure to test fit before gluing

Attach the shocks as seen in the picture. Push the shocks thru the holes.
Attach the suspension rods up to the hubs and the rocker arm suspension.

Attach the exhaust system as seen above. You will need to loop it around to make it fit.


Install the radiator and oil cooler, and be sure to test fit the location so the engine cover fits up to them properly


Attach radiator pipes as seen in picture

Before you start painting……make sure to scuff your body with a scratch pad to help for good paint adhesion. Then washing with Dawn dishwashing soap to get rid of any skin oils off the surface. Use Tamiya White Surface Primer on the body.

If you are building a March 86c that requires the engine exhaust hole to be plugged up, use the exhaust pug and super glue it into the hole.

If you are building a 1986 Budweiser, Copenhagen March, you must attach the rear wing strut bracket, strut and endplates


For the 1987 Cummins kit, I recommend Tamiya TS-16 Yellow

For the 1986 Budweiser kit, I recommend Tamiya TS-8 Italian red

For the Copenhagen kit, I recommend Tamiya TS-14 and Mustang Poppy Red

