
This blog will show the step-by-step process of converting the 1/25 MPC Dan Gurney’s Olsonite Eagle Indy kit into the 1968 Bobby Unser Rislone Leader Card Racers Offy Eagle – Indy 500 winner.
The kit:
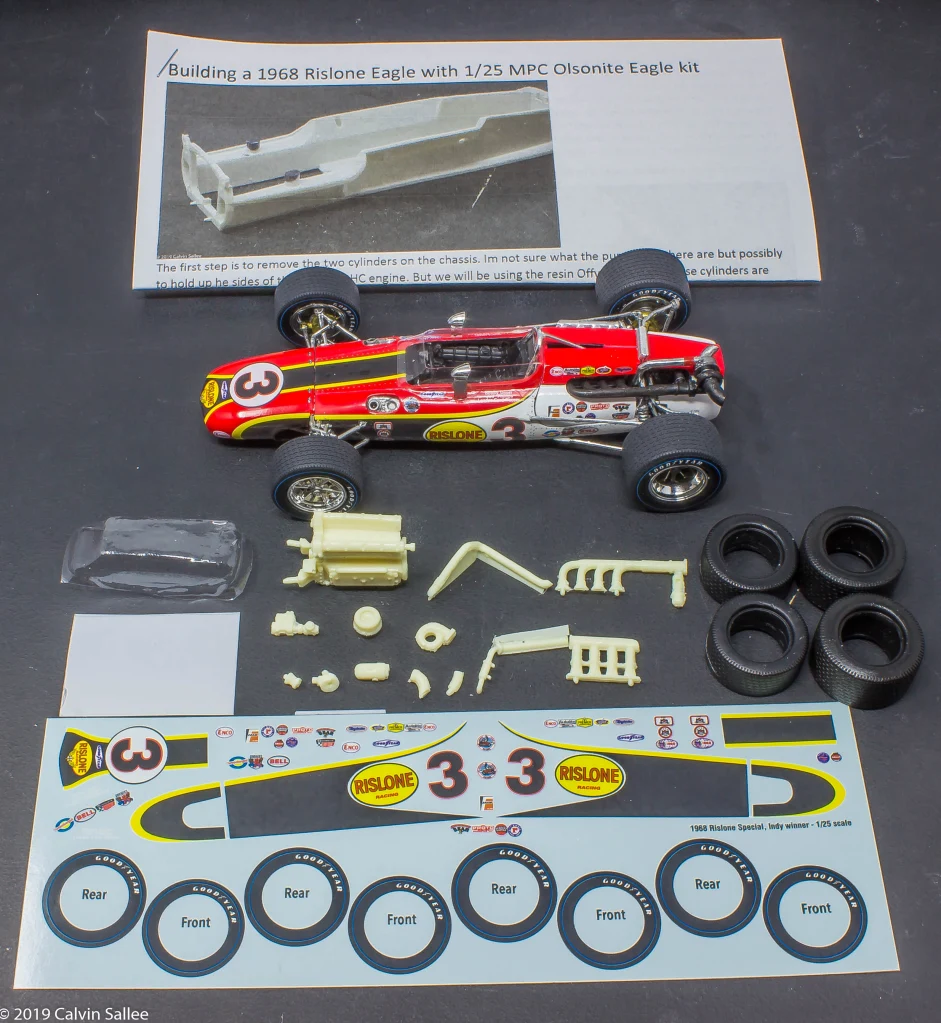
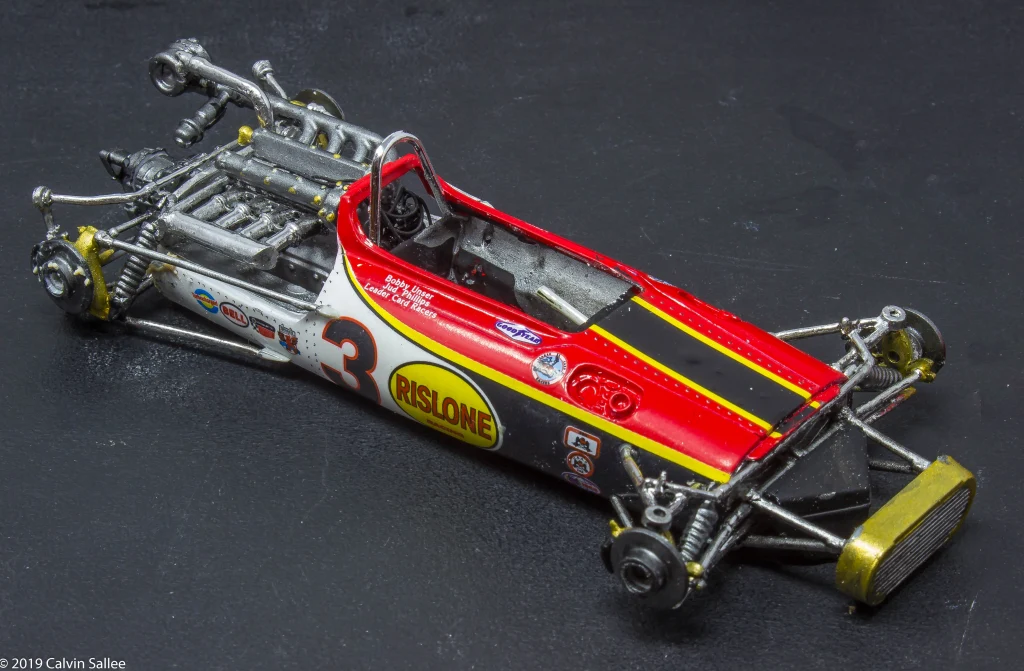
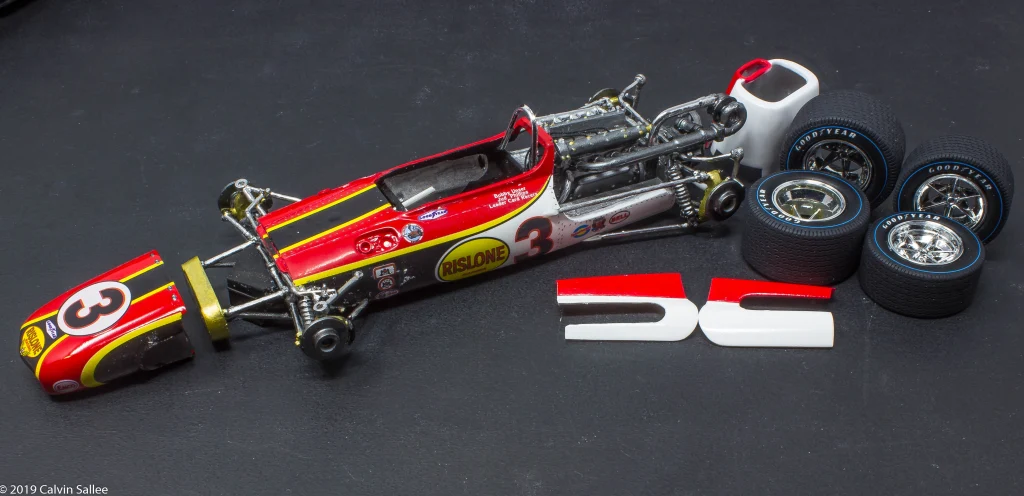
Building a 1968 winner was a challenge before this post because of the scarcity of the old MPC Rislone Eagle kit that goes for a huge amount of money and makes it hard to justify to build and the donor kit we are using for this conversion only comes with the FORD V-8 and Chevy V-8 engines. But now there is an easy and cheaper way to build a 1968 winner with the NEW Classic Racing Resins 1968 Indy 500 winner conversion kit, which can be purchased HERE. This kit has the rear engine Offy engine with the proper engine mount setup to attach to the MPC Olsonite kit engine hookup, the proper turbo setup, vac-u-form windscreen that replaces the over-sized thick kit windscreen, and the beautiful super sharp accurate black resin tires designed by Indycals, and this kit also comes with the accurate Rislone body decals and blue line tire decals. This conversion package is the best yet for this kit.
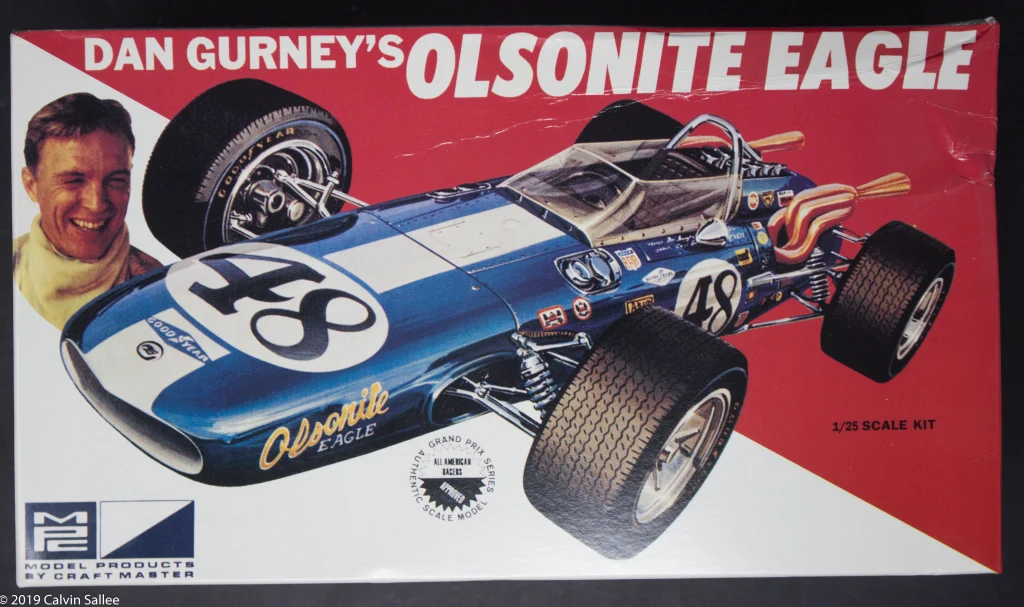
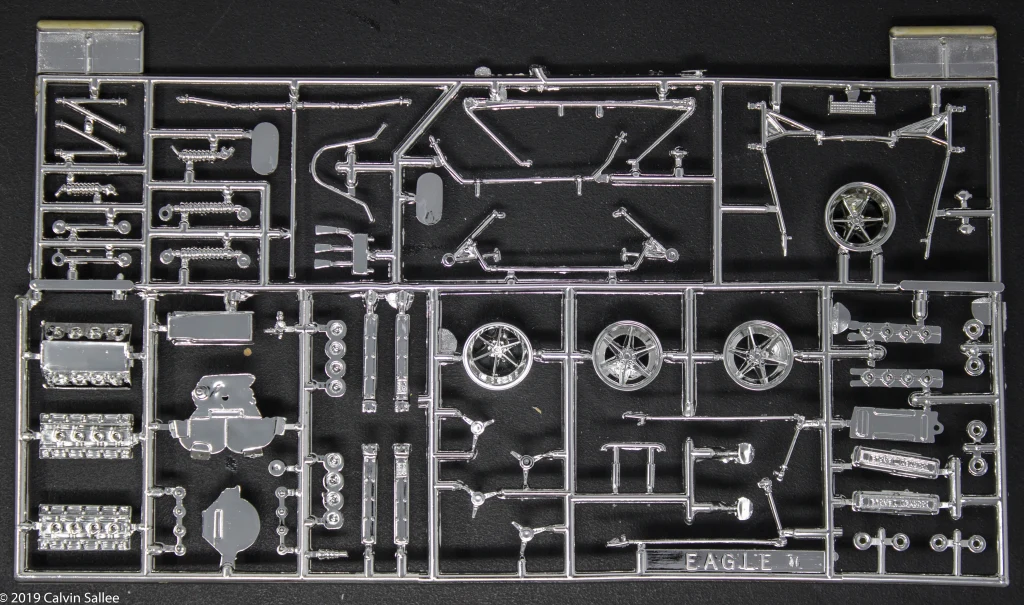
The kit we will be using for this conversion can be easily found on ebay HERE. MPC reissued this kit about 20 years ago and there is still lots hanging around readily available. There is a bunch of great features in this kit.


The decals in this kit are designed and printed by Indycals


The beginning steps
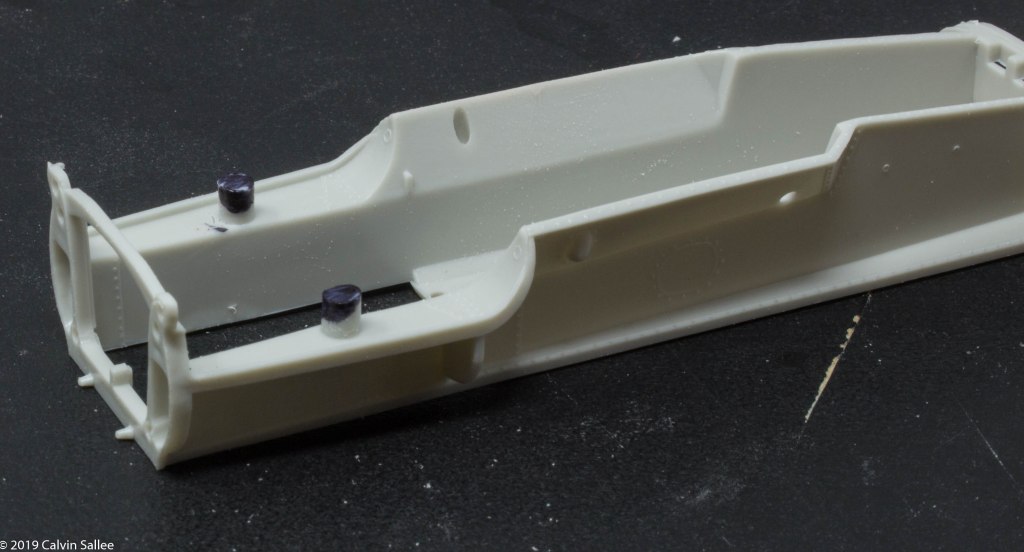
The first step is to remove the two cylinders on the chassis. Im not sure what the purpose of there are but possibly to hold up he sides of the FORD DOHC engine. But we will be using the resin Offy engine and these cylinders are unnecessary. Use a Dremel and grind them off and use sand paper to sand flush.

Glue the engine bulkhead onto the chassis as the kit instruction advise. Glue in the dash and foot peddles if you choose to. Make sure to flip the dash so the steering shaft hole is on the bottom. This was obviously an error when the kit was designed.

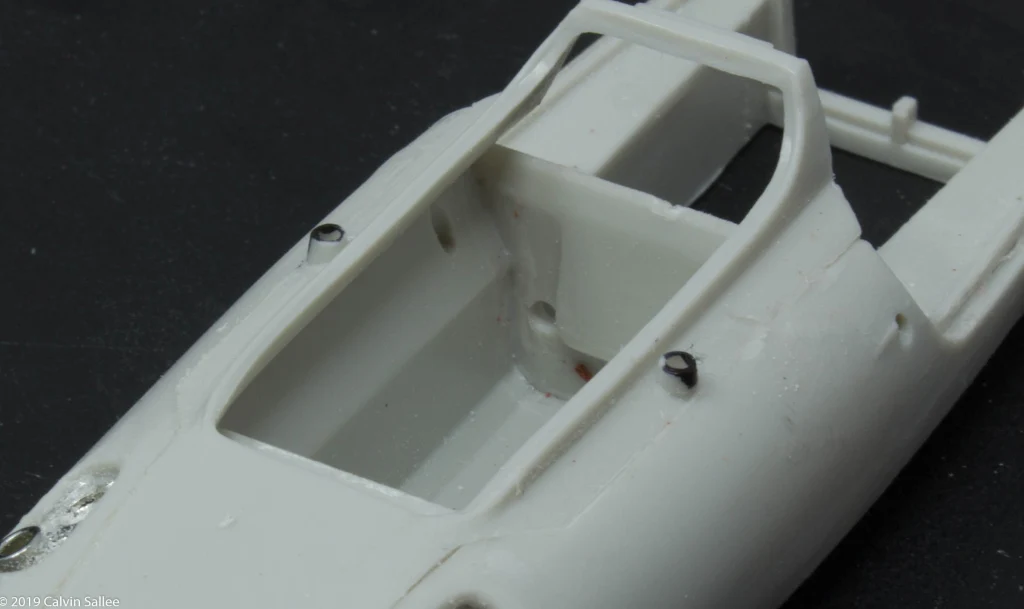
Glue on the fuel inlets on the side of the side body panels. BE SURE to test fit the side panels and cockpit cowling before gluing. Get familiar with how the lines and gaps behave when all of them are put together. It also helps to sand off any fine plastic flashing off the edges of the panels. This kit has a little bit of flashing and its a good idea to sand and take a razor blade and clean all the edges and test fit once or twice. With this build I chose to glue the cockpit cowling on to make painting and the build cleaner looking as the cockpit detail is not very important to me, I prefer to have a nice sharp looking body and choosing to have a removable cockpit cowling will require way more test fitting and the risk of the bodywork not fitting how you want after the paint and decals are apply. Im also choosing to sand off ALL rivets on the body panels as I find it unnecessary to have rivets on a 1/25th scale model as the actually size would be almost non existent and when polishing the body later on after the paint has been applied causes real issues with rubbing thought the paint job where the high rivets are. So with all that said I will be using the Indycals decal body rivets. These decal body rivets are cleverly designed to trick the human eye to look like an actual rivet with the fine principle of optical allusion.

Be sure to cut out a piece of styrene to fill in the head support of the cowling. ( I went through most of the build and forgot this critical step, but luckily I can go back into this blog and point it out so you don’t miss this step, early on.) Use the 0.010″ piece of white styrene supplied in the kit and use the template in the last page of the instructions to cutout and glue into place.
Remove the mirror cylinders on the sides of the cockpit cowling. These need to be completely sanded off and flush with the cowling
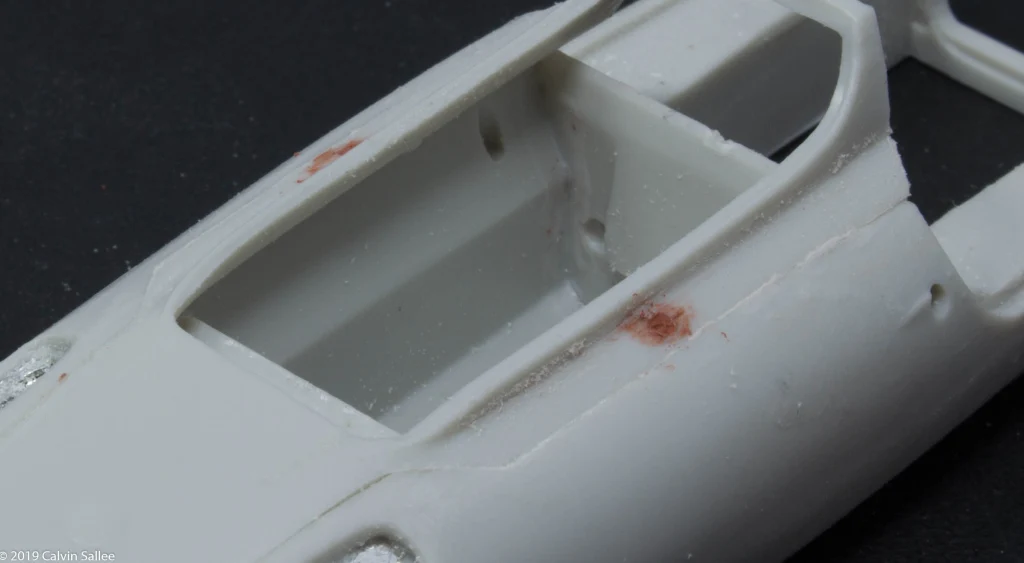
Fill the removed mirror mounting locations with Bondo spot filler if needed.
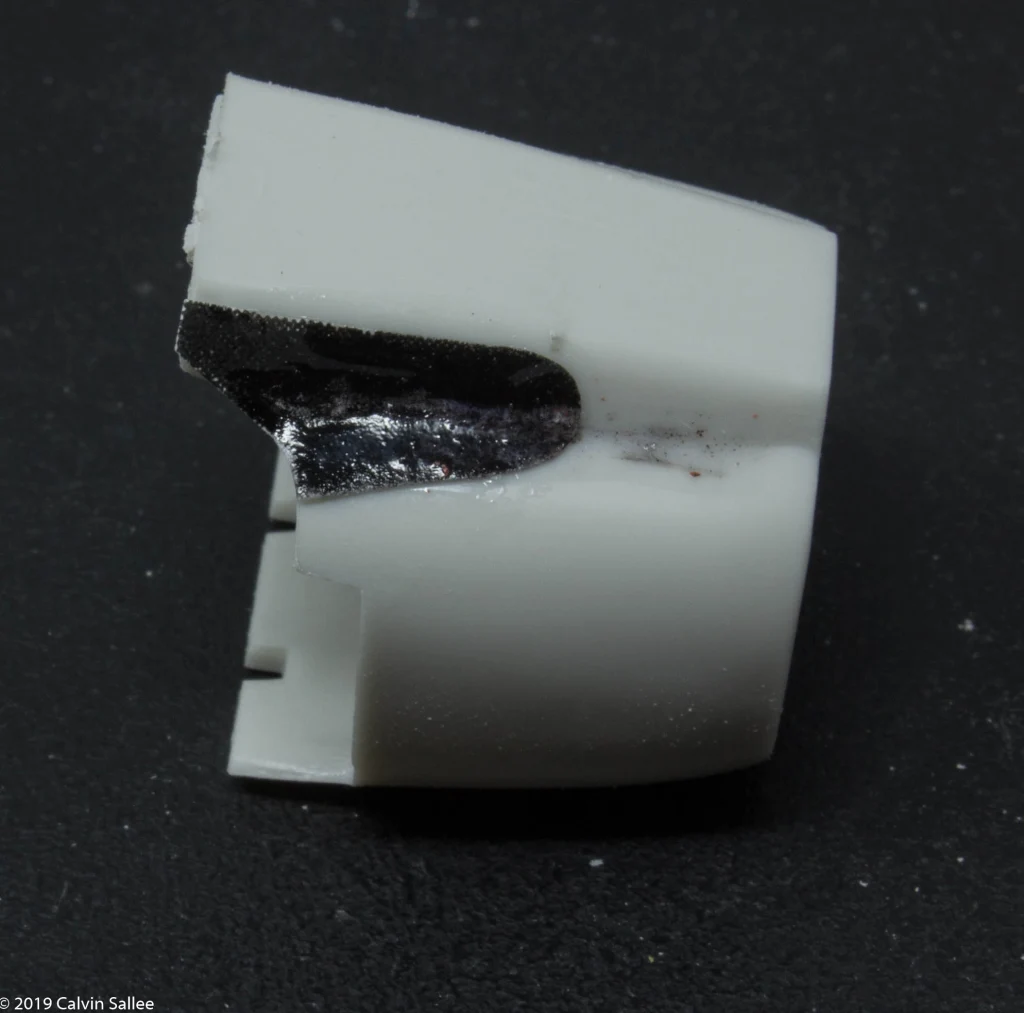
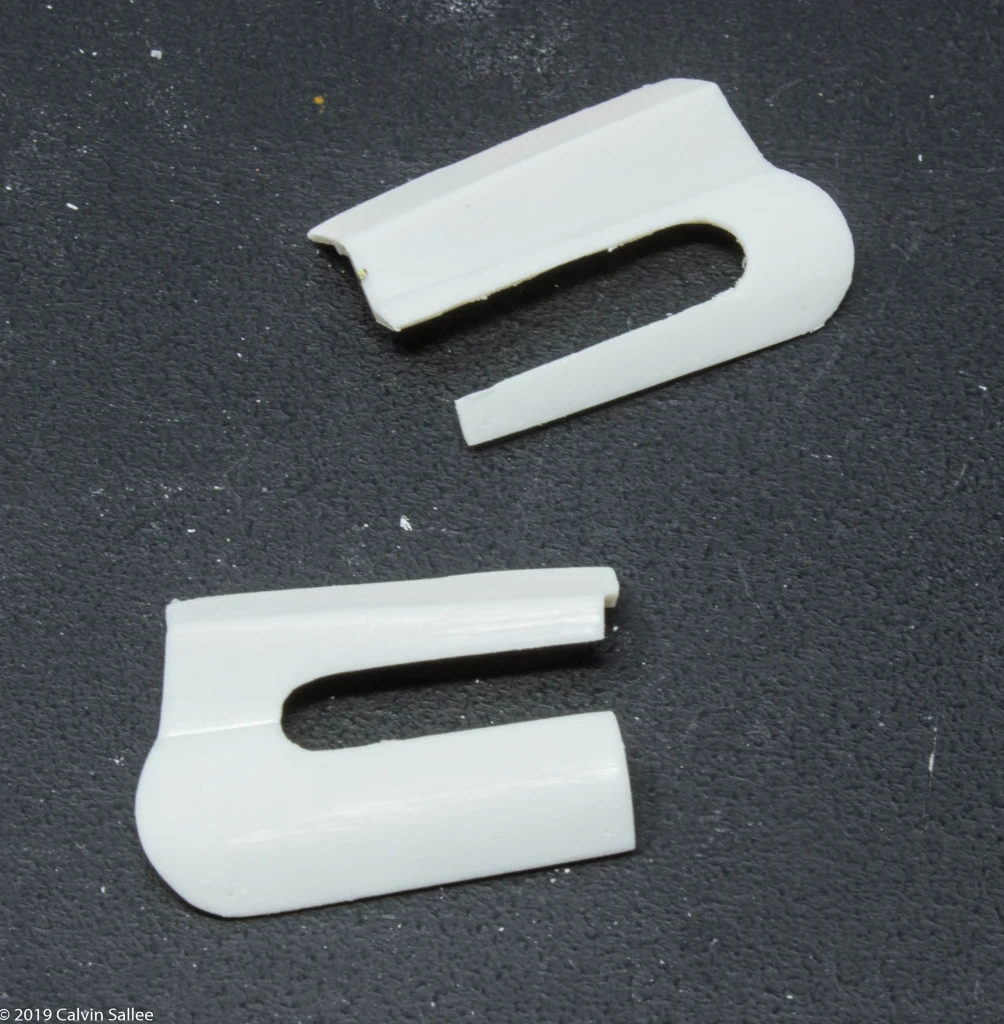
Use the paper template supplied in the kit on the last page of the instructions to cutout the location on the left side of the tail cone. This will give space to the exhaust and turbo assembly.

I recommend using a Dremel to mill out the shape of the cutout. Be sure to study pictures to make sure you are satisfied with the shape.
Engine prep

Use a #54 – 0.052″ Drill to drill out the holes for the intake pins. The locations of the holes are indented into the side of the engine
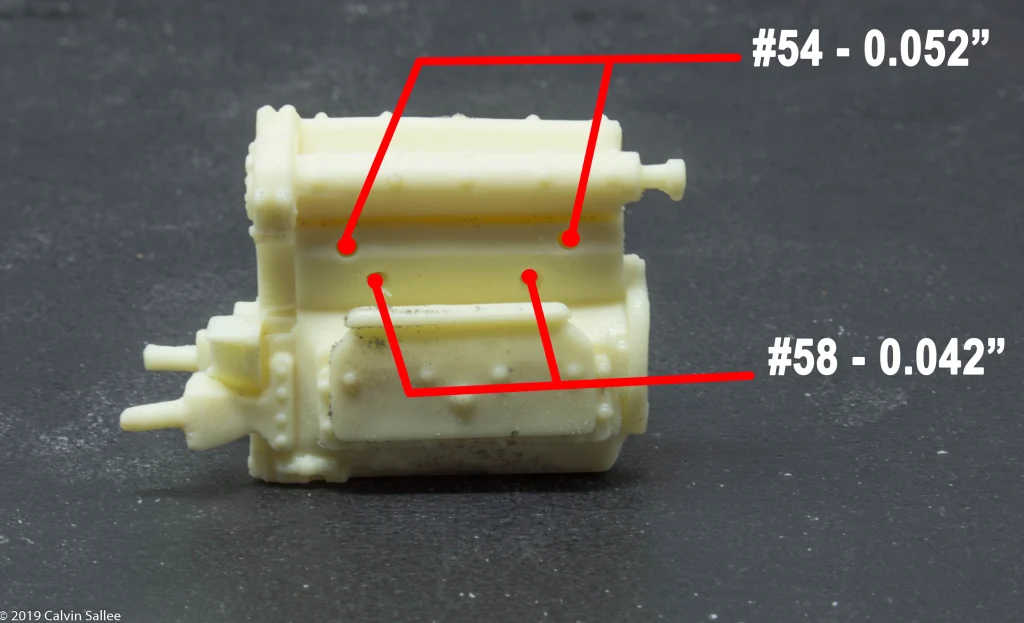
Use a #54 – 0.052″ Drill to drill out the holes for the exhaust pins and use a #58 – 0.042″ The locations of the holes are indented into the side of the engine

Use a #52 – 0.062″ drill for the locations for the front of the engine.


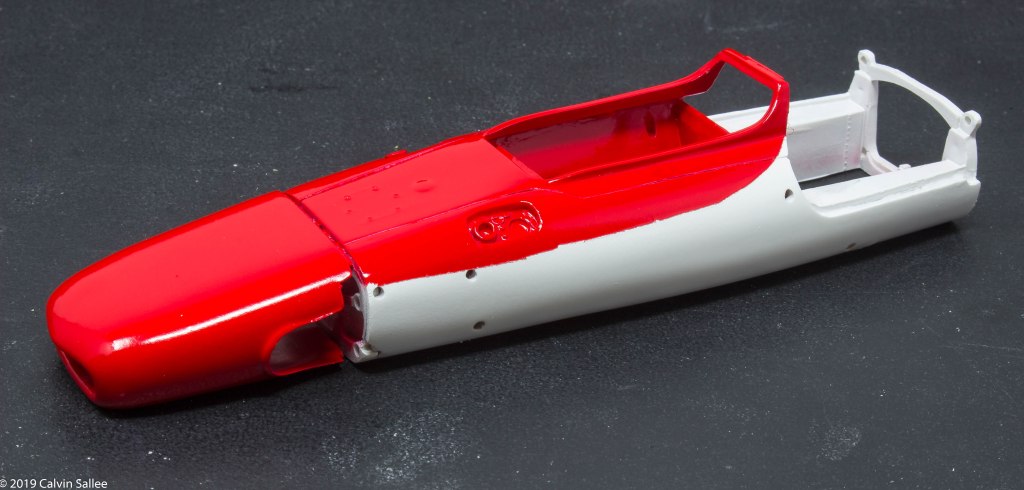
Painting the body
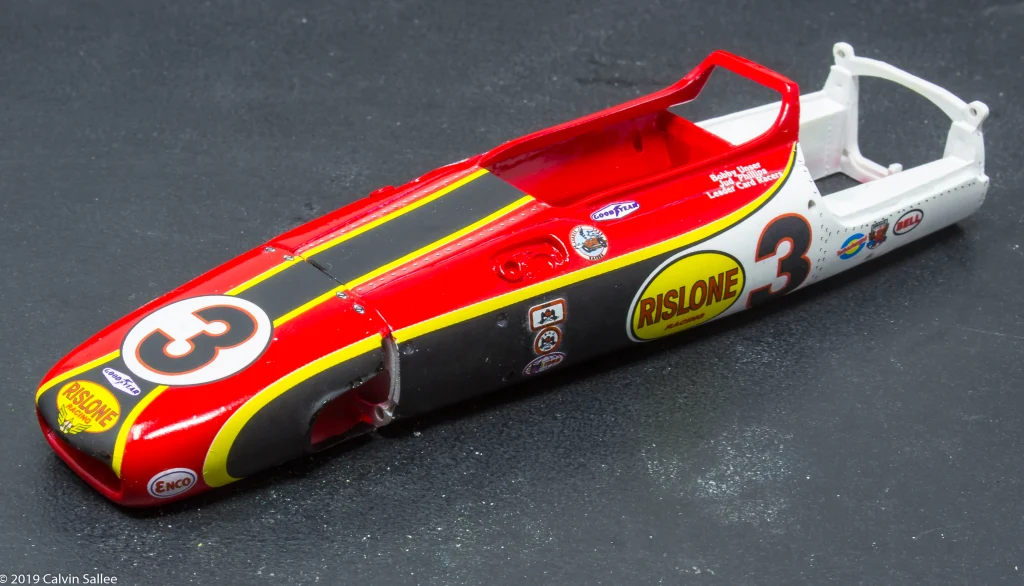
The Rislone Eagle has a four tone paint job, but fortunately for use model builders we only have to worry about painting two of the colors. The Indycals sheet takes care of use with the black and yellow stripe already included. I will be using Tamiya lacquer paints but this only a suggestion. I prefer Tamiya Spray paint in most situations when adding color to my paint jobs I will be spraying Tamiya White Surface Primer over the light grey MPC plastic surface, first. Next will be light multiple coats of of Tamiya TS-26 Pure White and then mask off half the car to apply the Tamiya TS-8 Italian Red. I will apply the Indycals Decals next and after the decals setup I will give the whole body a few coats of Testors Clear lacquer to protect the body and decals as a protective coat and the clear also makes the colors “pop” more.
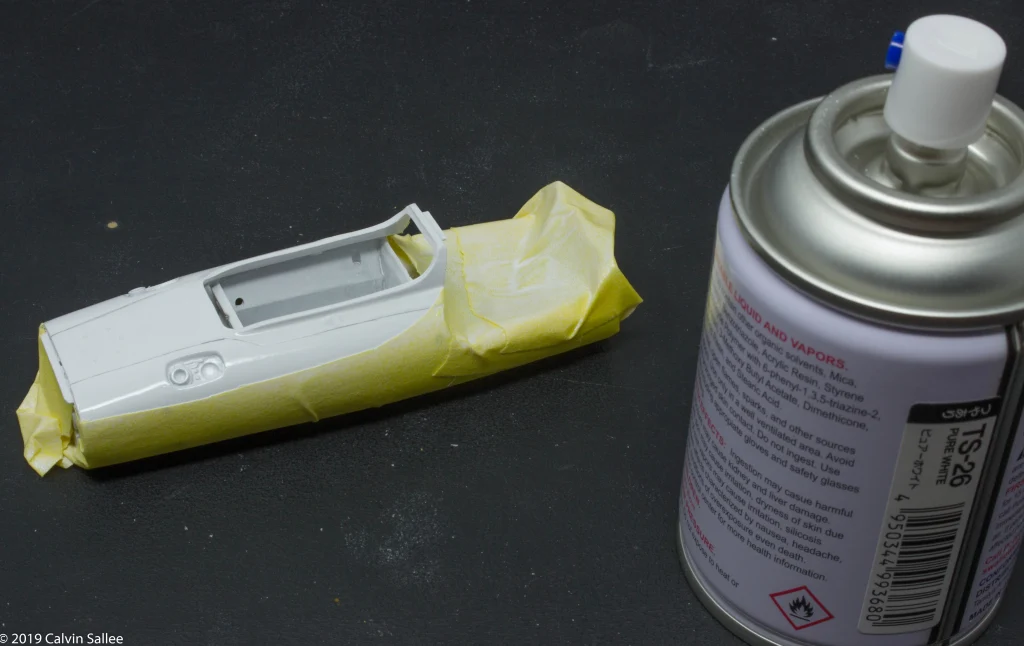
Before you start painting……make sure to scuff your body with scratch pad to help for good paint adhesion. Then washing with Dawn dish washing soap to get rid of any skin oils off the surface. Use Tamiya White Surface Primer on the body.
After the primer has dried for a day, check for any imperfections with the primer job. If it looks good spray the body with Tamiya TS-26 Pure White with very light coats, I recommend VERY light coats with Tamiya TS-26 White as I’ve noticed it has the tendency to be very thin and will “run” really easily.
Masking
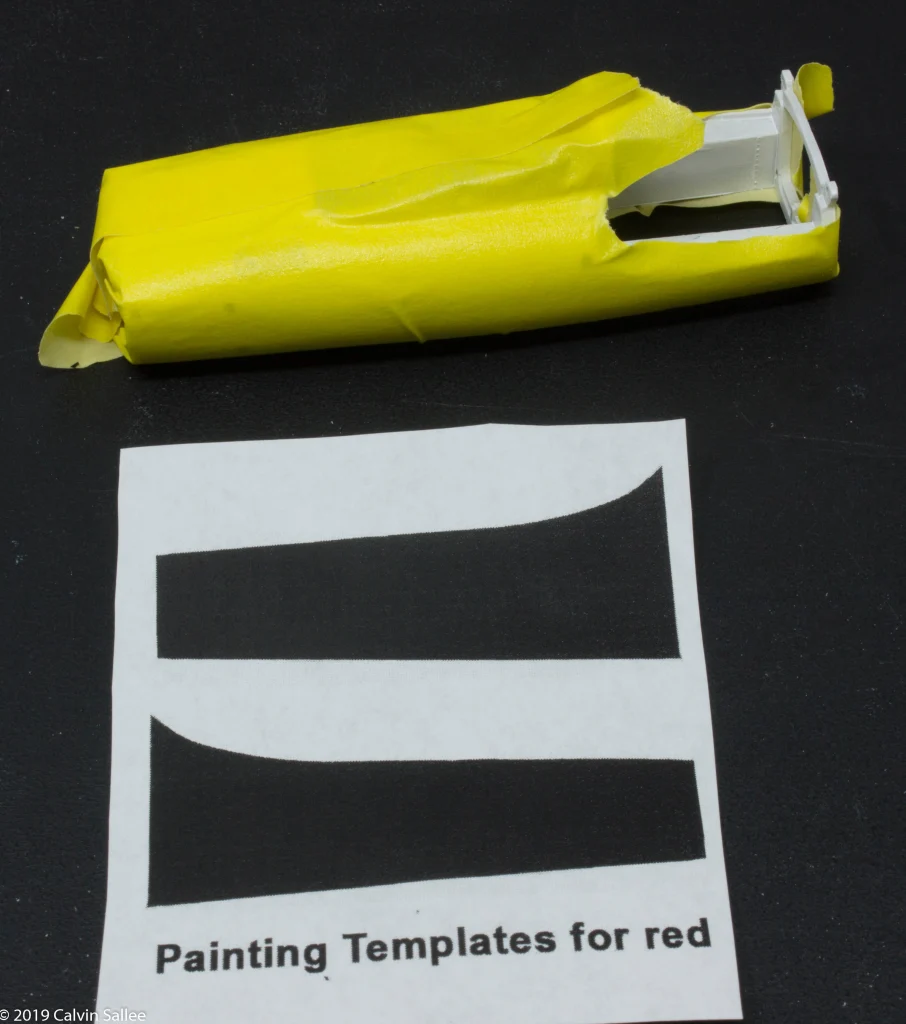
For the masking process Im going to mask with wide 3M Automotive Refinish Masking Tape 388N. The tape resists moisture, solvents and outdoor exposure and leaves sharp, clean paint lines without buildup. For a large area two tone paint job that requires a large area of the body to be masked off I like to use the method of covering the whole car and then use the masking template over the area that needs the tap to stay.
Use a sharp brand new X-acto knife blade and cut the masking tape following the template edge. The edge will be covered over with the decal but we still want to get the masking edge as close and possible. The template I made lines up flush with the front bulkhead and the top rear tip will end right to the edge of the head rest part of the bodywork.

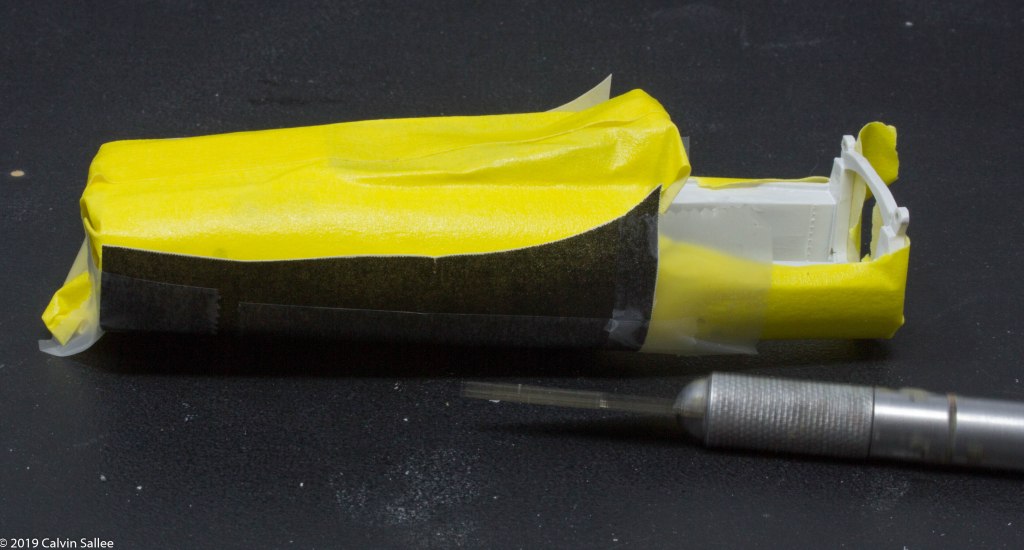
After you masking edge with the X-acto knife peal off the red area of the bodywork
A good useful trick I learned from Indycals back in the day was to seal your masking edge with the previous color (white) before spraying the next color (red). Doing this trick will help insure that the color we plan to spray on next (red) will not bleed though under the masking tape with is always a problem when multiple colored paint jobs.

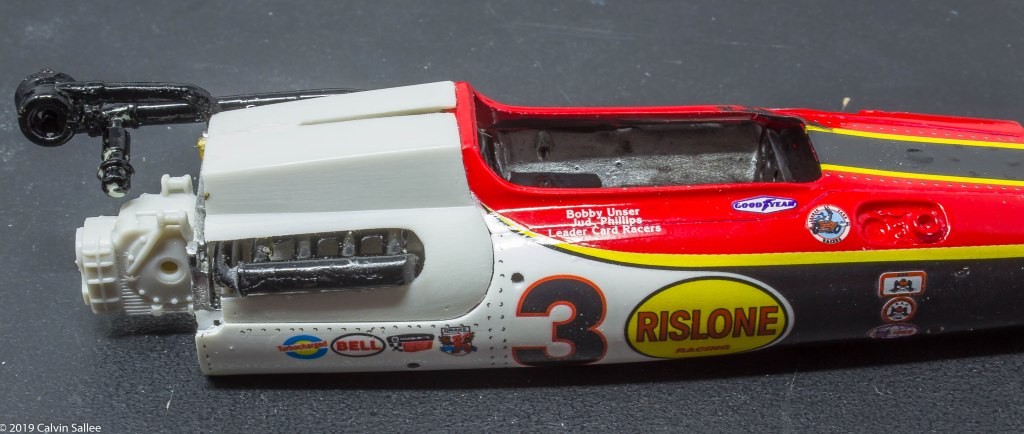
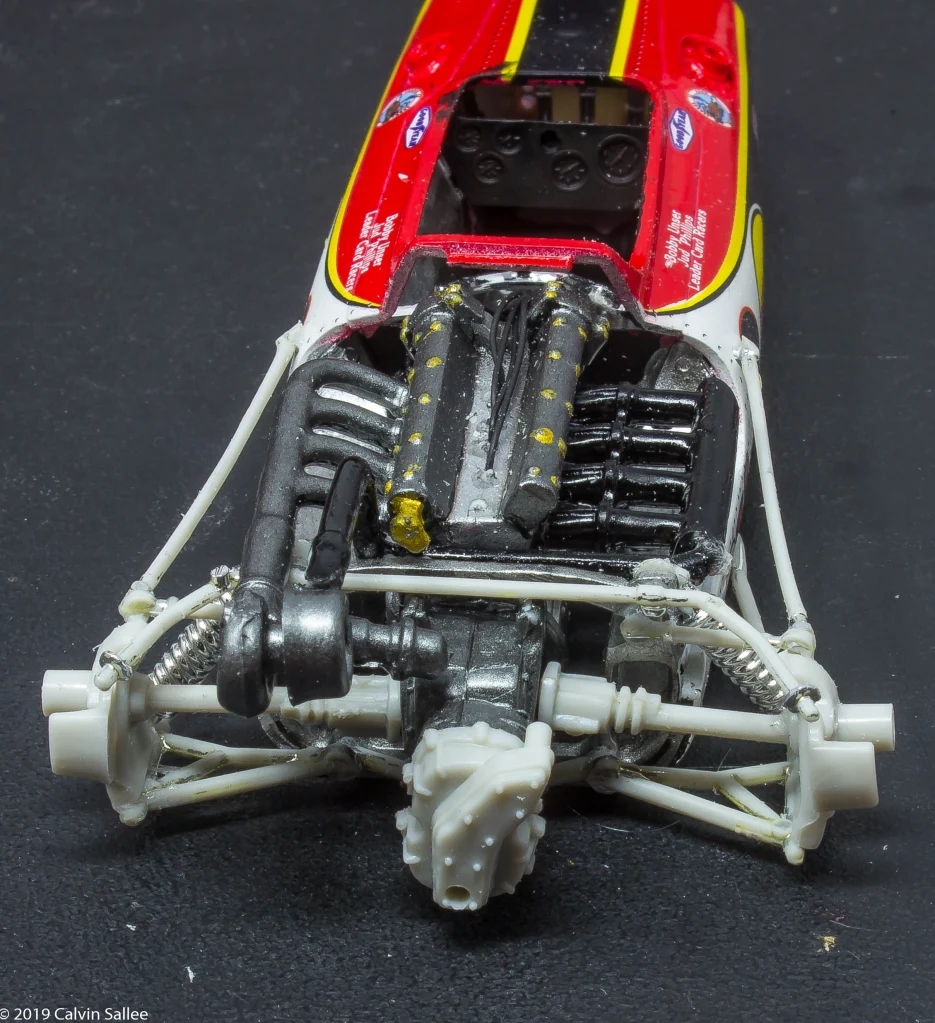
I went ahead and painted the red on the nose too. There is no masking required on the nose. I would recommend holding off on painting the engine cover and tail cone until the engine and all the turbo parts are installed to make sure the fit properly.
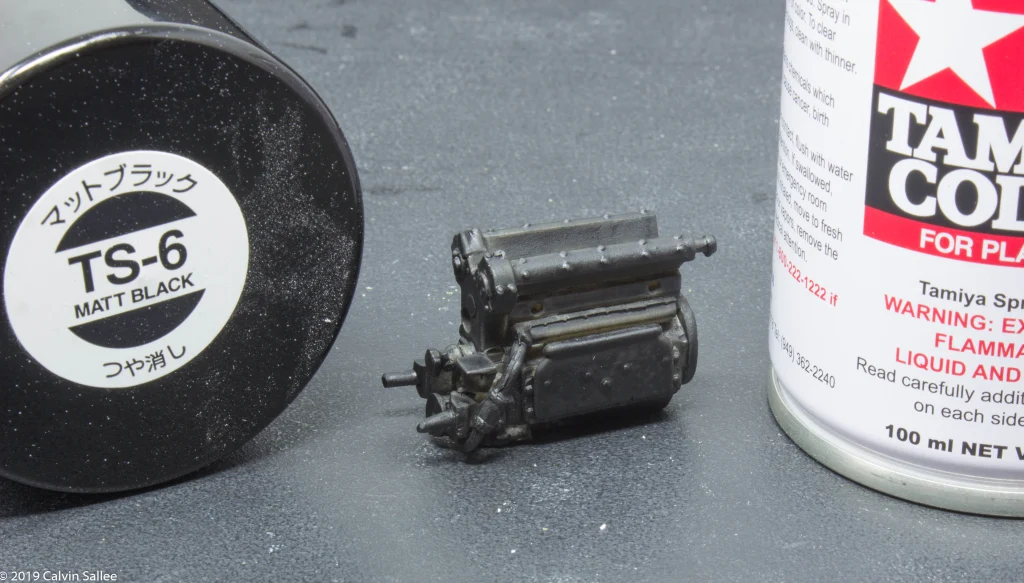
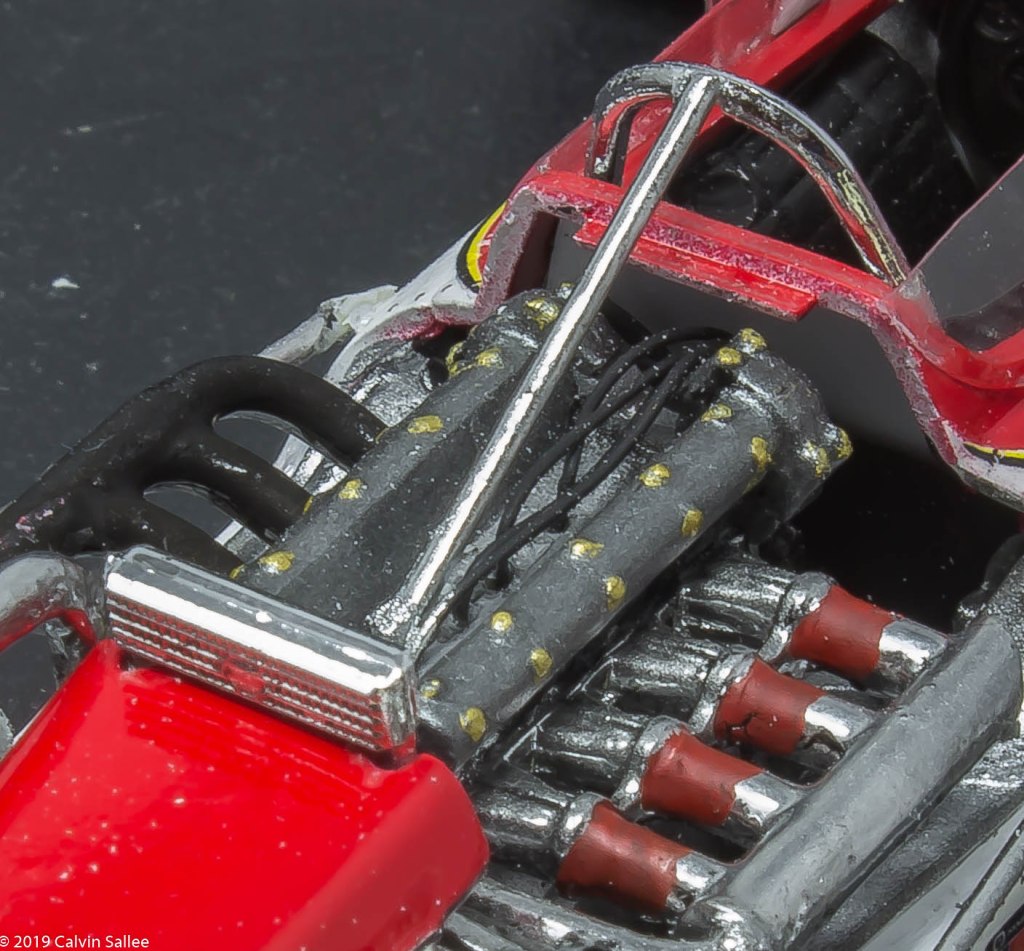
Whenever I paint a metallic surface in this case the Offy engine block which is Aluminum, I like to give the surface a light coat of flat black. Its always a rule of thumb to apply a dull black surface before a metallic as it helps the reflective properties of the metallic paint reflect off a more realistic look.

I always liked the look of Krylon “Short cuts” Chrome for the best aluminum look for engine blocks.

Adding spark plug wires is optional. There is no wires in the kit. I just added them for a nice touch as the plug wires are always the main attraction on detailing an engine. Also doing a flat black wash adds depth to the engine details.
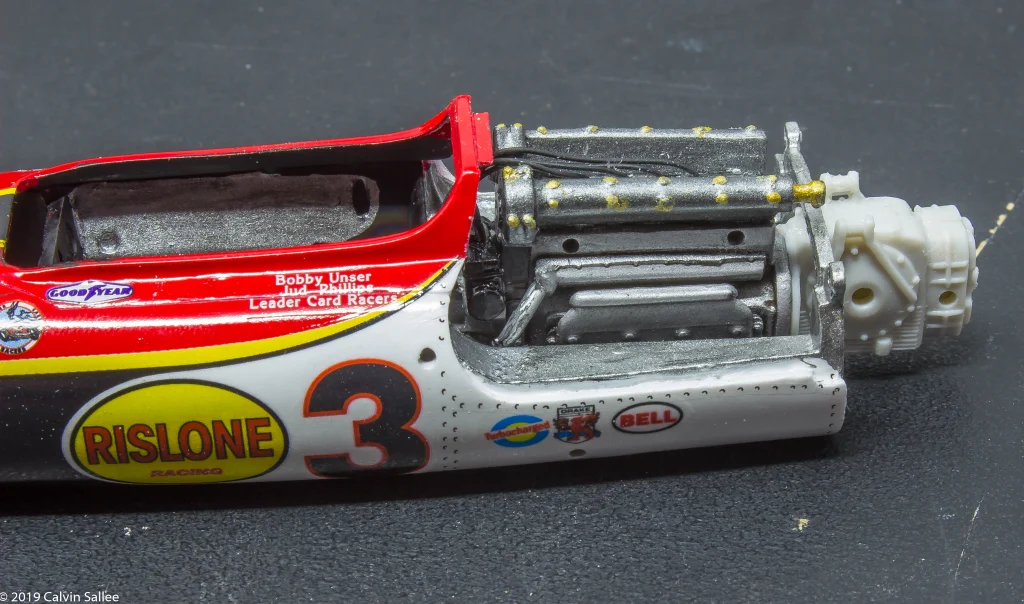
After the engine is fitted up and painted. Fit the trans-axle into place. The trans-axle fits onto a little pin on the chassis.
Fitting the engine cover
In order to make this a removable engine cover, they need to stay separate just like on the real car. Luckily the offy engine covers are included in the MPC Olsonite Eagle kit.
Clean flashing off before test fitting.
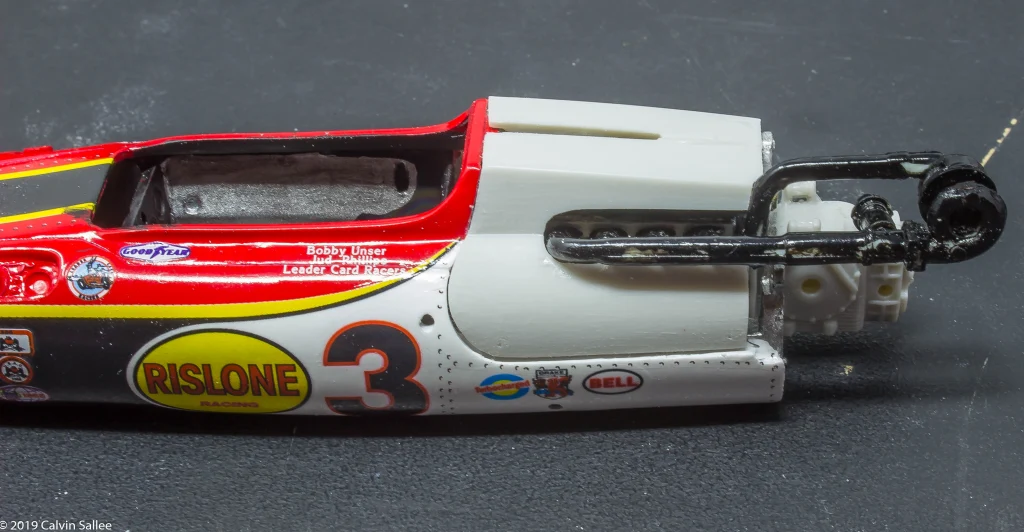
Test fit to your liking and Id recommend test fitting the engine covers along with the rear tail cone to make sure the engine cover and tail cone are aligned properly.
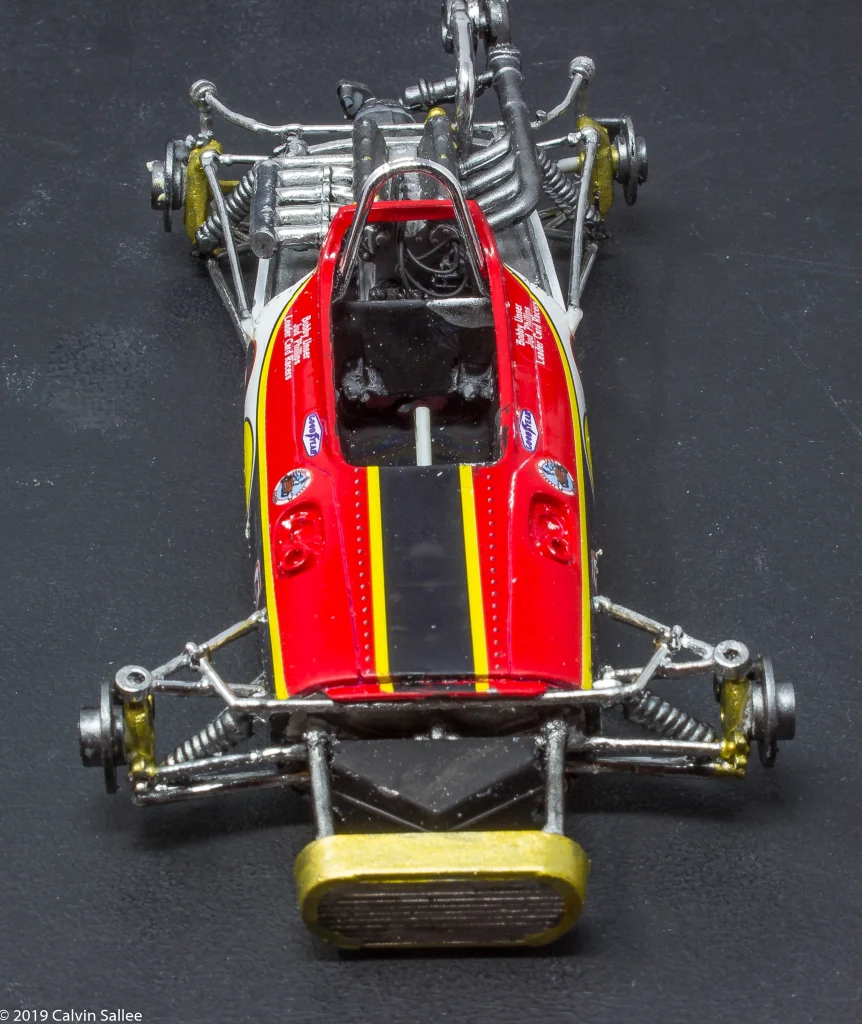
Fixing the rear suspension
One of the biggest flaws of the MPC Olsonite Eagle kit is the rear width of the rear wheels sit way too far apart. Even the untrained eye can see the width problem. This next set will show you how to correct this problem. This method was developed by Indycals many years ago….

The first step is to remove the hooks on the ends of the wishbones these would normally hold up the upright pins but these will not be needed after all the modifications and the uprights will be sitting on top of the ends of the wishbones
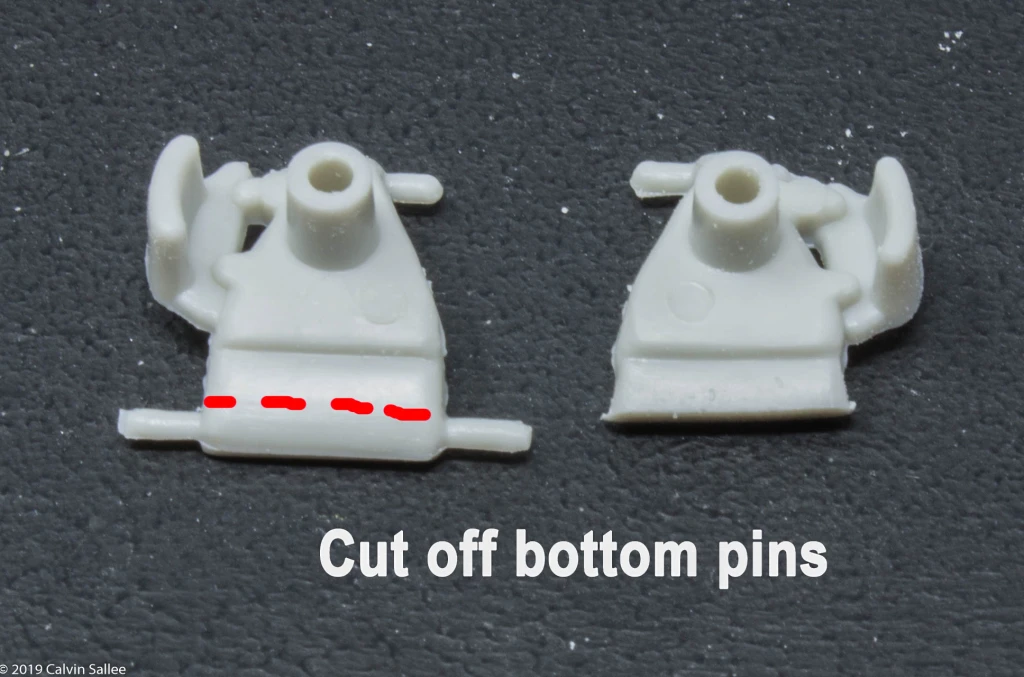
Cut off the bottom of the wishbones level with the top of the pins. (See picture above)
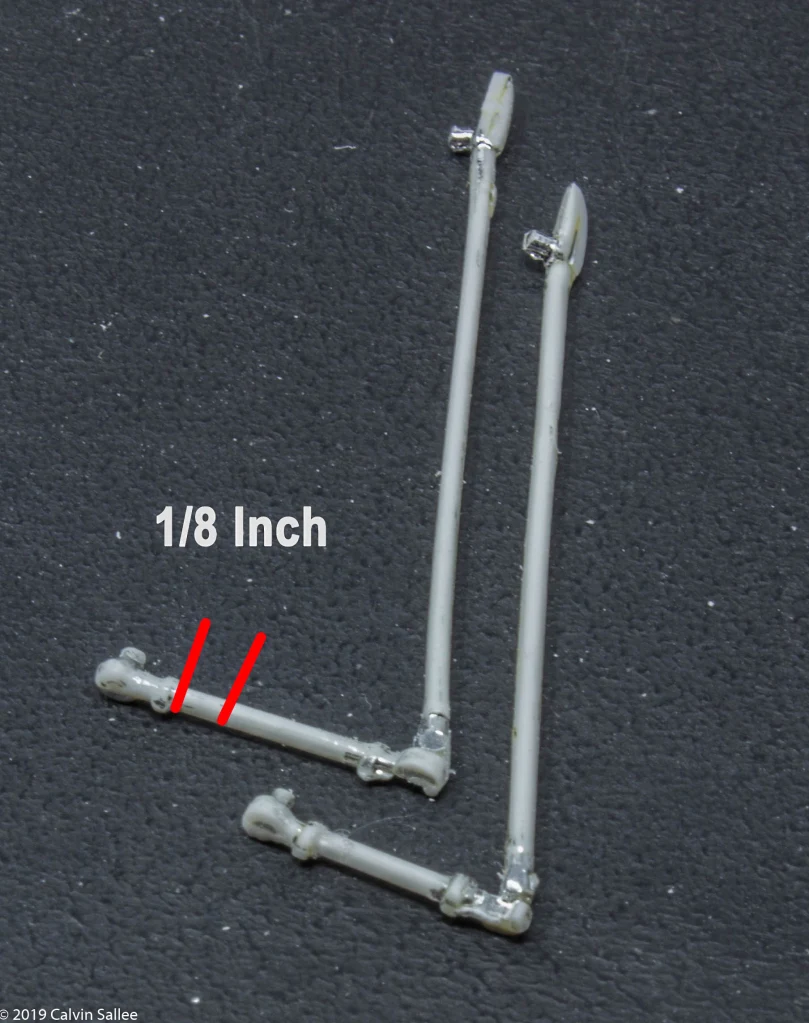
Since the uprights are being brought inwards the upper wishbones will need to be shortened as well. As seen in the picture above cut off the the section highlighted 1/8 of an inch (3.2mm) Use an X-acto knife and carefully cut off the amount needed.
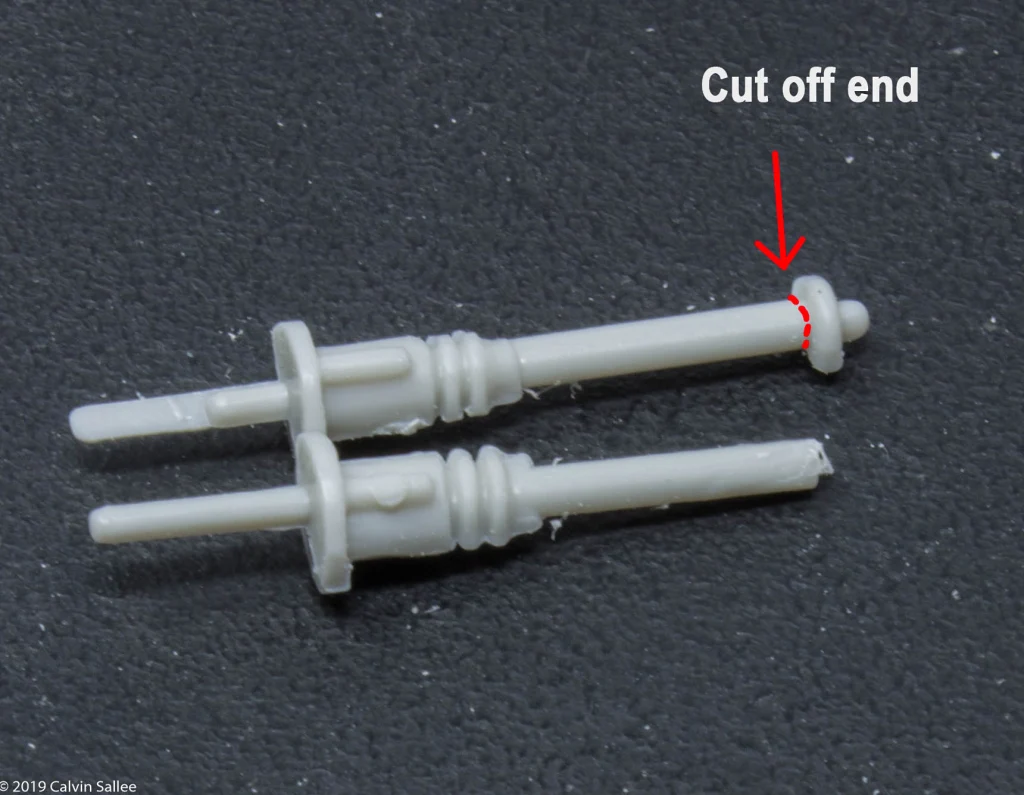
Cut off the ends of the half shafts as seen marked on the picture above.
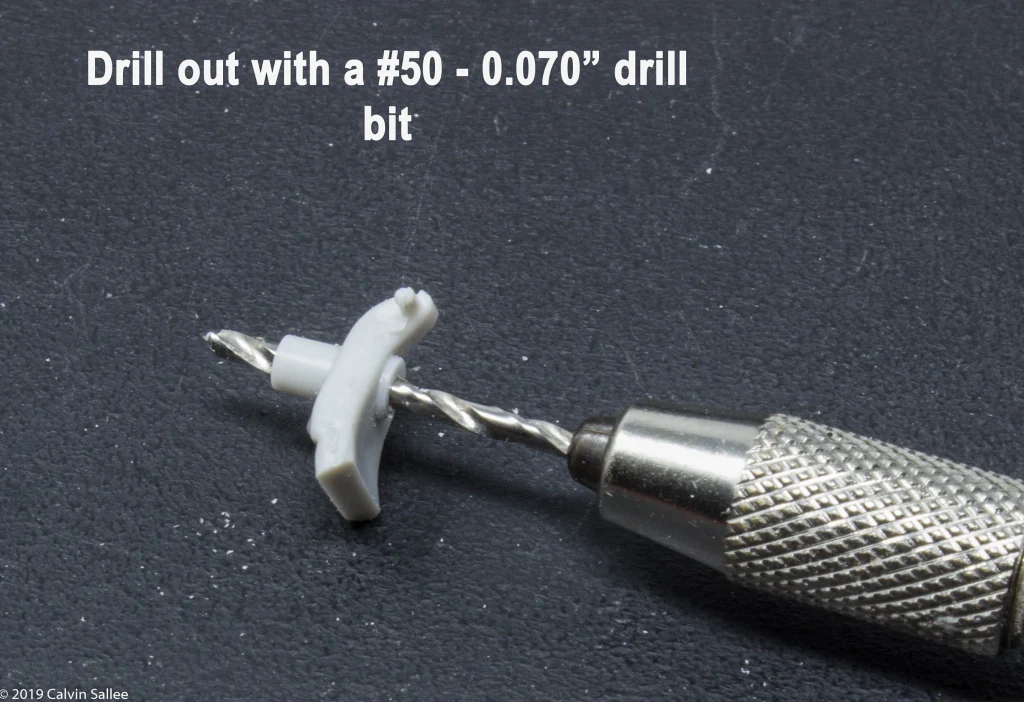
Since the ends of the half shafts are cut off this changes the diameter of the ends of the half shafts. In order for the half shafts to fit into the uprights, drill out the centers with a #50 – 0.070″ drill bit using a pin vise.
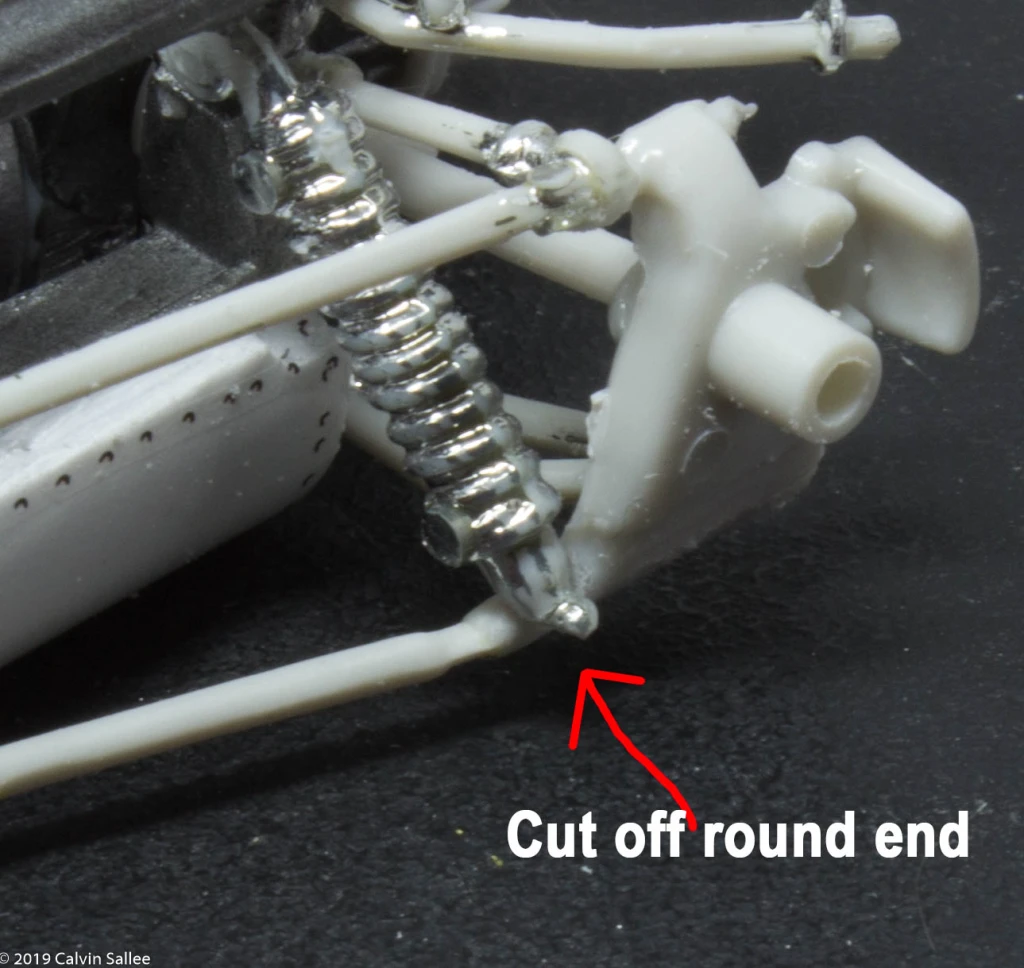
Cut off the end of the shock bottom and fit it on the top of the lower wishbone.
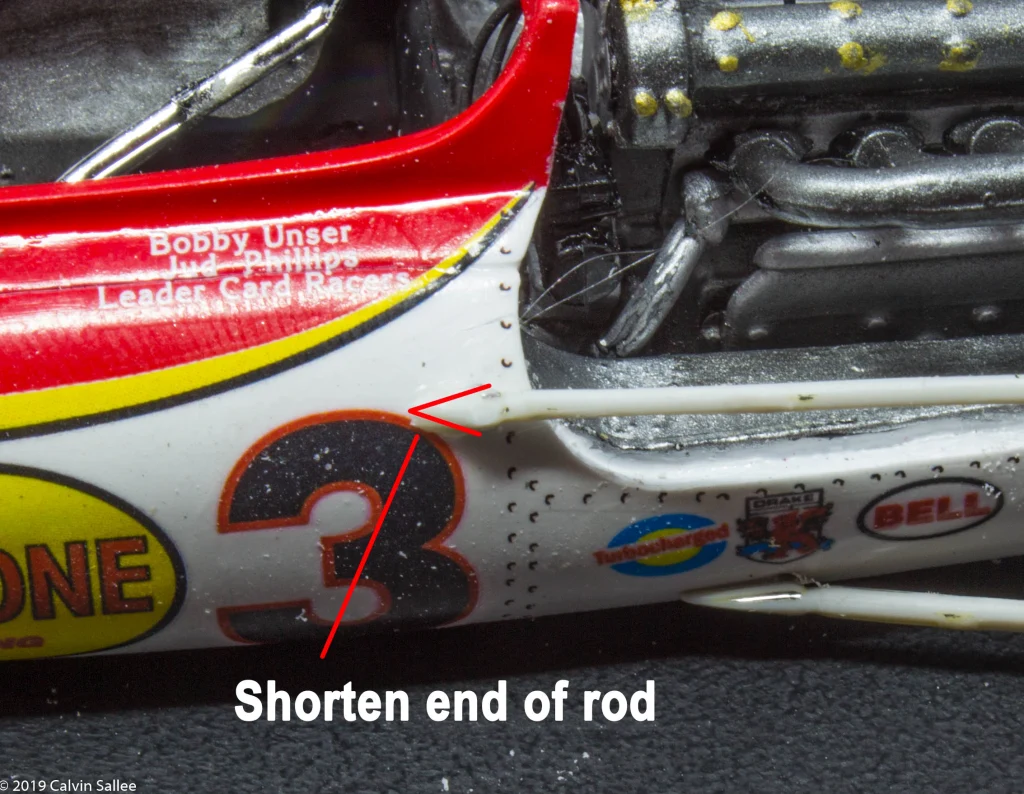
Before assembling the parts I recommend shorting the pointed part of the top wishbone support rods that attaches to the body. Not shorting the ends might result of your number 3 to get covered over by this pointed part of the rod.

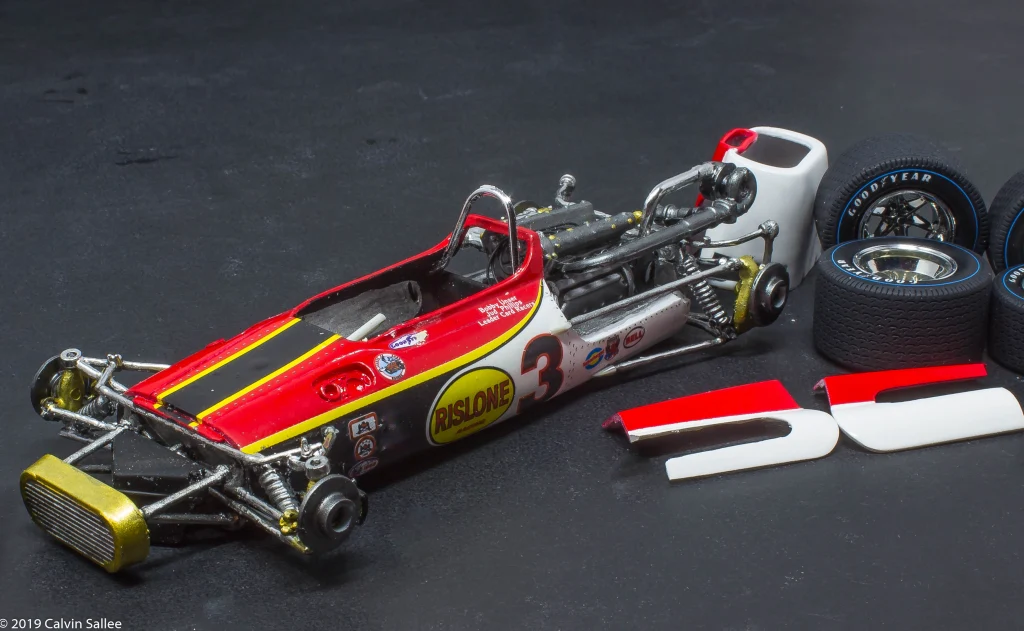
Basic build-up
After these part modifications the most of the build can be completed using the kit instructions. The process of putting everything together is all the same but with shorter parts. After these basic steps are complete the next few important conversion steps are next….
Fitting the nose on is one of the final steps. I recommend test fitting before you add any kind of glue. I found the fit with the front radiator very tight, so look out for that.
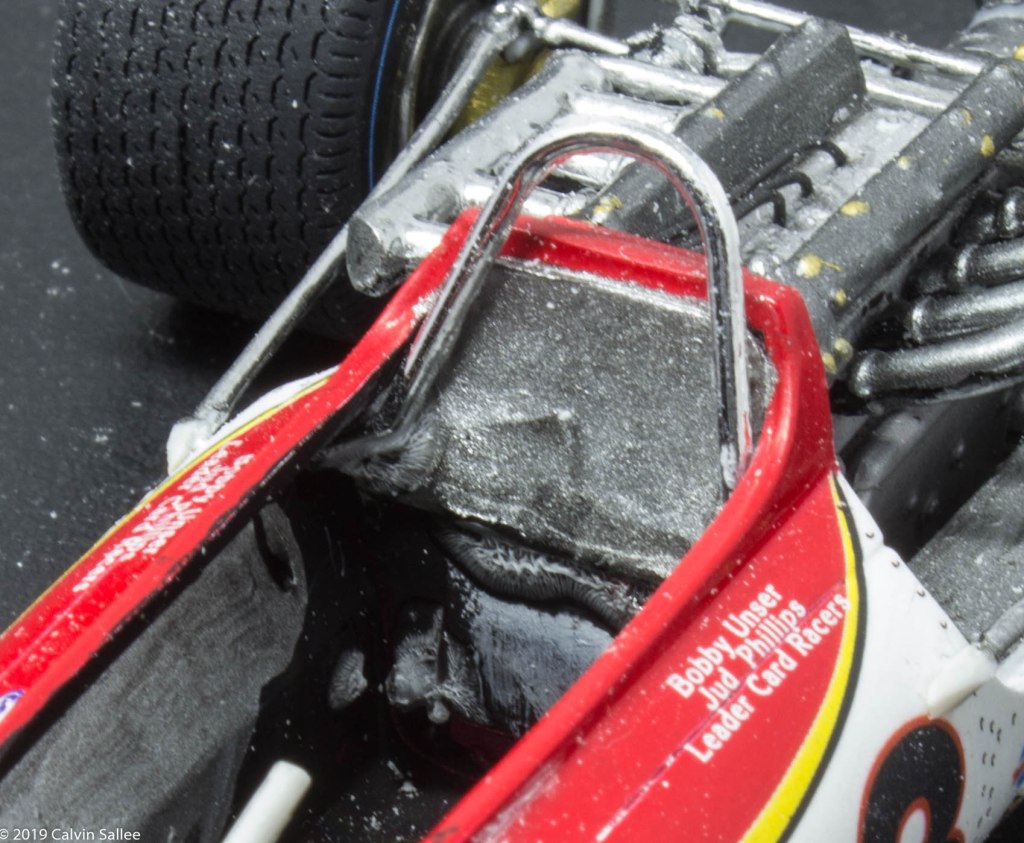
The location where the kit wants your to attach the roll over hoop is not correct. The location they want to attach it is too far forward. The best location is to push it far back and lift it up so the bottom bends in the roll bar are up touching the inside angled edge of the cowling as seen in the picture.
Fit on the engine covers. Then its important to not forget the roll bar support. I waited to do this towards the end to make sure I glue a styrene rod in the correct location with the engine cover as reference.
Tires

Take the Indycals 3d designed Goodyear Blue Line tires and scuff them up. These tires have been cast in black resin to help the model builder with the painting process as with traditional resin tires that are cast in tan resin are harder to paint the tread pattern part, its difficult to get the paint to flow into the tread pattern without having the underlying tan resin color showing though. In order to cover over the showing tan color requires more and more black spray paint and when you add more paint the more the sharp crisp detail is lost. But with the Indycals black resin tires there is no need for multiple coats of paint and the black resin hides any un-painted areas deep down in the tread pattern.

I love the shade Tamiya TS-82 Rubber Black provides for painting resin tires. Back before Tamiya came out with the Rubber Black we always just used regular Tamiya Matt Black but that wasn’t accurate because if you study a rear rubber tire closely you will notice it has a slight dull shade of many colors.

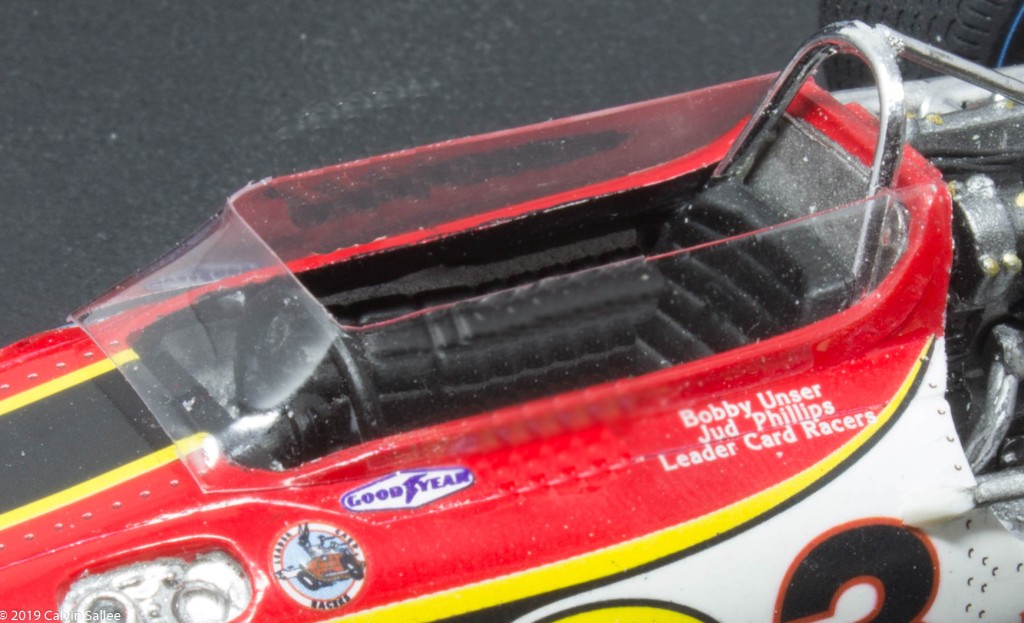
Windscreen
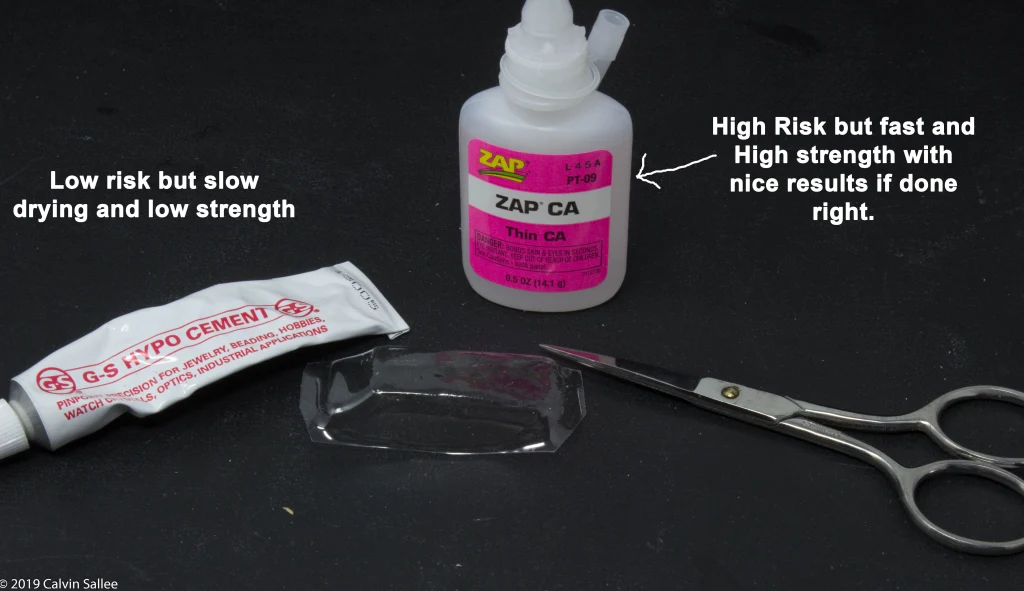
Most people really freak when cutting out clear vac-u-form windscreens. But there is not much worrying with this one as most of the cutting is straight and easy. I recommend using small scissors and I prefer using ZAP CA glue which is very risky and most people would think Im absolutely crazy, but if you know how to handle it, it will yield great strong results! But if you dont want to have hi risk the the G-S Hypo cement is the way to go.
Mirrors
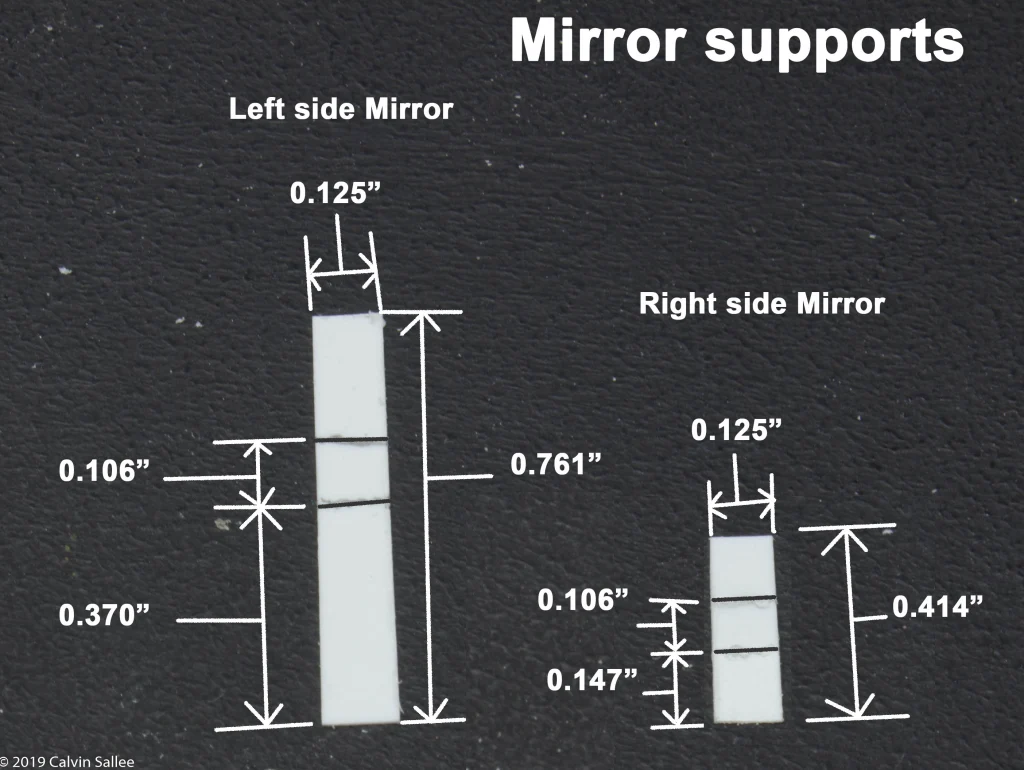
Use the styrene supplied in the kit to measure out and cutout the mirror supports. This was a race day setup wit the mirrors. Cutout and bend at 90 degrees in the center lines.
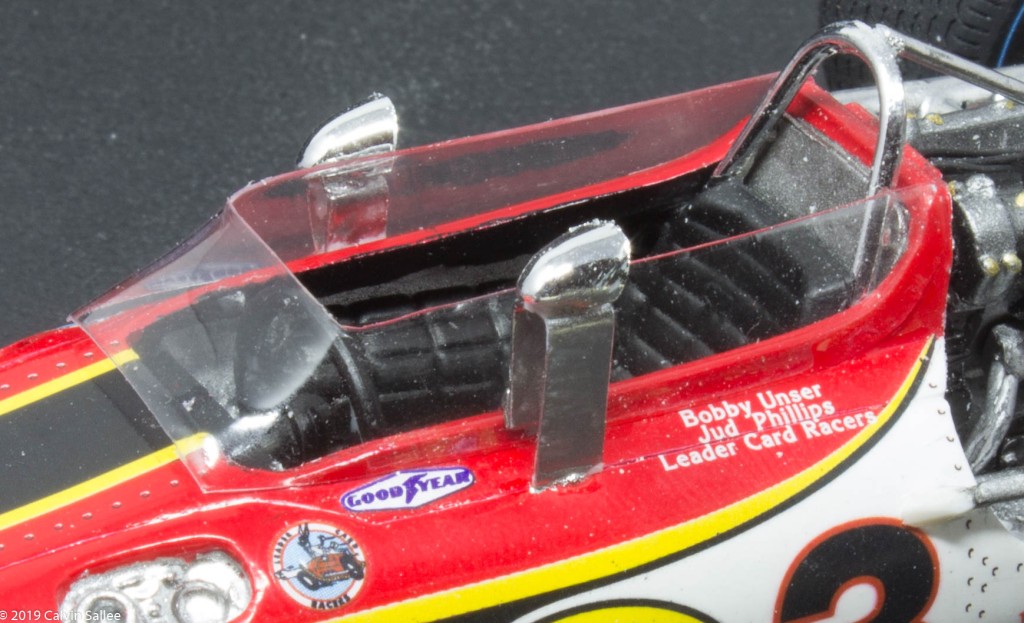
I recommend taking tweezers to hold onto and dip the outer edge of the support into a puddle of Super glue and place it on the gap in between the body and top cowling. Hold down for a few seconds until the super glue holds and then push the whole super up against the windscreen and take some CA- Glue and dab a little bit on the gap between the mirror support and windscreen.
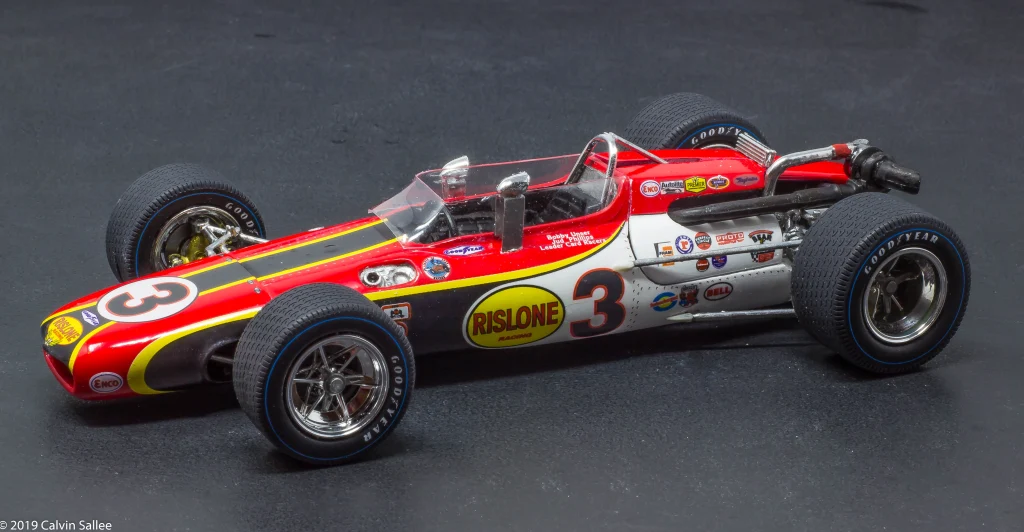
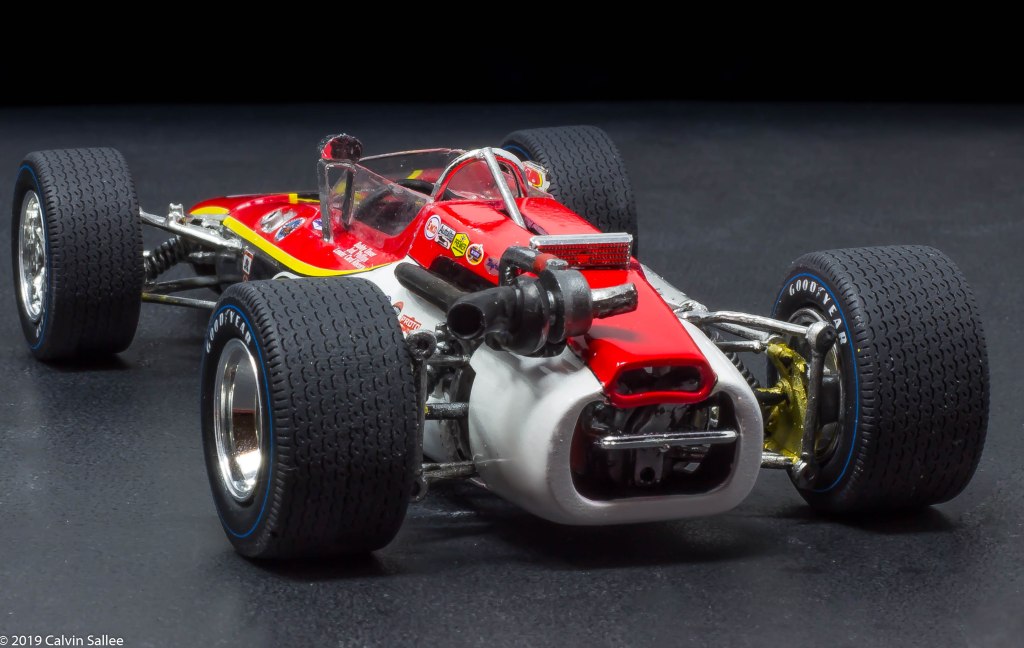
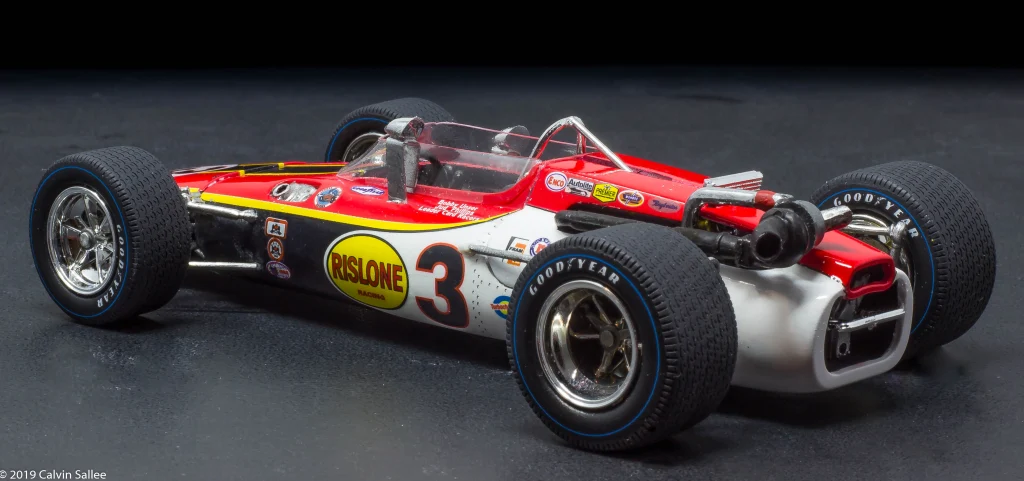
The finished results….