
This resin kit requires the following Paints, tools, and supplies:
Tire Bleach
Scuff Pads
Spot filler
Super Glue
Tamiya Grey Surface Primer
Tamiya White Surface Primer
Molotow Liquid Chrome Marker
Solvaset Decal Solution
Surgical scissors
CA Glue
Canopy Glue
- Pin Vise drill
-Various Grits of sandpaper
-Sanding sticks
AK Crystal Magic Clue (AK9323)
#49 0.073" Drill bit
61 0.039" Drill bit
Be sure to fill and clean your resin parts. I do not use mold release in my molds, but the resin still can pick up some oil contamination from the silicone rubber mold. Soaking in tire bleach or spray and rinse down with oven clean works well. Also, when sanding the surface of the resin its recommended to use Dawn dishwashing soap as that helps get any possible grease off
Wash and soak all resin parts in Tire Bleach overnight. This will remove all contamination/oil off the resin. 99% isopoyl alcohol works really good too!
After the Tire Bleach Bath, use a scratch pad and scuff up the entire surface to clean and scratch up the surface for proper Primer adhesion. Using a high grit sandpaper to clean up and scratch up the surface is also recommended. Failing to clean the surface will result in paint not adhering or paint reaction.
Fill in any pin holes or air bubbles in the resin with putty or Bondo Spot filler and sand smooth.
This is the most important part of the build.
Parts list:
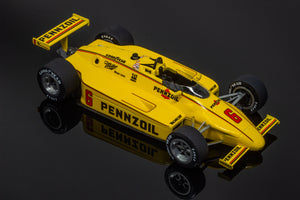
These are the parts lists for the following kits: Pennzoil, Penske, Miller High Life Penske, Interscope, Machinists Union, Skoal Bandit, and Coors Light.
Penske Parts list

Coors Light Parts List:

Machinist Union Parts list:

Skoal Bandit Parts List:

Interscope Racing Parts List:


Drill out the locations on the body

Glue the top rear suspension like shown in the example below


Drill out the rear hubs with a #49 0.073" drill

Glue the rear hub/brake assembly to the top rear suspension. Take note there is a difference between the right and left hub. The difference is on the bottom where the bottom wishbones are attached

Attach the rear wishbones to the bottom of the rear hubs. Be sure to observe the difference between the right and left wishbones.
Push the brass axle rods into the hubs into the drilled-out trans-axle

Insert front wishbones to the front end. Make sure to test fit before gluing and understand the difference between the left and right-hand wishbones.

Attach front hubs to front wishbones

Test fit the front hubs, making sure everything is level and your ride height is correct
Test fit wheels and tires to ensure proper ride height and squareness

Glue on the front brakes.

Glue on the roll bar, Fuel inlet, and popoff valve

Attach rear wing support, rear wing and endplates

Since all Marches have different exhaust exit layouts, you will need to use the Dremel to expand the hole side length and size


Glue Windscreen, I like using AK Crystal Magic Clue (AK9323)