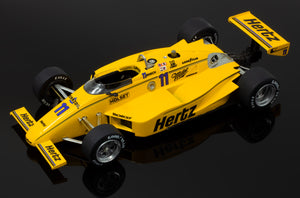
You can buy the 1985 Hertz March 85C Resin CLICK HERE
This resin kit requires the follow Paints, tools, and supplies:Tire Bleach
Scuff Pads
Spot filler
Super Glue
Tamiya Grey Surface Primer
Tamiya White Surface Primer
Tamiya TS16 Yellow
Tamiya TS38 Gun Metal
Tamiya TS29 Semi-Gloss Black
Tamiya TS6 Matt Black
Tamiya TS82 Rubber
Molotow Liquid Chrome Marker
Solvaset Decal Solution
Surgical scissors
CA Glue
Canopy Glue
- #52 0.063” Drill bit
- Pin Vise drill
-Various Grits of sand paper
-Sanding sticks
Parts List


PARTS LIST
| -Body -Undertray -Clear Windscreen A1 – Cockpit A2 – Transaxle A3 – Seat A4 – Brake Disc A5 – Dash A6 – Rear Wing Strut Mount A7 – Steering Wheel A8 – Right Front Wing A9 – Left Front Wing A10 – Left Radiator A11 – Right Radiator A12 – Rear Wing Strut A49 – Rear Wheel Nuts A50 – Pop Off Valve A51 – Mirrors A52 – Front Wheel nuts A53 – Turbo Inlet P20 – Penske Rear Wing P21 – Penske Left Rear Wing Endplate P22 – Penske Right Rear Wing Endplate |
C27 – Rear Tires C28 – Front Tires C29 – Rear Wheels M31 – RIGHT Rear Lower Wishbone M32 – LEFT Rear Lower Wishbone M33 – RIGHT Front Lower Wishbone M34 – Left Front Lower Wishbone M35 – RIGHT Front Upper Wishbone M36 – LEFT Front Upper Wishbone M37 – Rear Upper Suspension M38 – LEFT Rear Hub M39 – RIGHT Rear Hub M40 – LEFT Front Hub M41 – RIGHT Front Hub M42 – Rollover Hoop M43 – Fuel Inlet M44 – Exhaust M45 – Steering Rod Sleave M46- Pull Rods M47- Steering Rod M48 – Rear Axle |
Part 1 – Clean up


Be sure to fill and clean your resin parts. I do not use mold release in my molds, but the resin still can pick up some oil contamination from the silicone rubber mold. Soaking in tire bleach or spray and rinse down with oven clean works well. Also, when sanding the surface of the resin its recommended to use Dawn dish washing soap as that helps get any possible grease off
Wash and soak all resin parts in Tire Bleach overnight. This will remove all contamination/oil off the resin.
After the Tire Bleach Bath, use a scratch pad and scuff up the entire surface to clean and scratch up the surface for proper Primer adhesion. Using a high grit sandpaper to clean up and scratch up the surface is also recommended. Failing to clean the surface will result in paint not adhering or paint reaction.
Fill in any pin holes or air bubbles in the resin with putty or Bondo Spot filler and sand smooth.
This is the most important part of the build.
Step 2 – Buildup
-Drill out the center of the Transaxle with a #52 0.063” Drill bit
-Drill out the hole for the steering rod sleeve with a #52 0.063” Drill bit

-Paint the Undertray with Tamiya TS-29 Semi-Gloss Black
-Paint (A2) Transaxle with Tamiya TS-35 Gunmetal
-Insert Brass (M48) Rear Axle into drilled hole of (A2) Transaxle
-Superglue the (A2) Transaxle onto the Undertray.
Glue on the following parts illustrated below

The white metal suspension parts need to be polished with steel wool or a soft brass wire wheel as the Penske Cars had Chrome suspension

Paint (A1) cockpit with Tamiya TS-29 Semi-Gloss Black
Paint (A3) Seat with Tamiya TS-6 Matt Black
Paint (A5) Dash with Aluminum and TS-29 Semi Gloss Black
Glue Seat and Dash into place
Step 3 - Body

Superglue Front wings onto the nose, be sure to test fit and develop a plan on how you are going to attach them properly.

Add a light coat of Tamiya Grey Surface Primer
Check for imperfections, sand, fill, sand, fill, and repeat
Add light coats of Grey Primer until all imperfection are gone.

Add light coats of Tamiya White Surface Primer
After Primer dries. Lightly sand smooth with high grit sandpaper.

paint Body with Tamiya TS26 Pure white and Tamiya TS-16 Yellow
Spray 3 coats
First coat spray light and get all the hard to spray spots first. Let sit for 1 hour
Second coat, makes it a little heavier, let sit for 1 hour
Last coat, spray heavy and then let dry for 48 hrs
Step 4 Wheels and Tires

Drill out rear wheel with #52 0.063” Drill bit
Paint the wheels Semi Gloss Black


Sand and Clean up the black Resin tires then spray Tamiya TS-32 Rubber on them. Apply Indycals tire decals and use Solveset Decal solution to soften and help the decals conform to the curvature of the tire.


Step 5 Rear Wing and Front suspension


Paint rear wing assembly Tamiya TS16 Yellow. Glue the (A12) Rear Wing Strut onto the (F17) Rear Wing. Then Glue on the (F18 and F19) Rear Wing Endplates onto Rear Wing
Before Gluing on the suspension parts, insert (M45) Steering Rod Sleeve though the front nose.
Glue on the following parts illustrated below

Step 6 Other parts and Windscreen


Before gluing the Undertray onto the body. Attach A10, A11, M44, and A53.
Next, Superglue the cockpit into the body. Then superglue the Undertray onto the bottom of body

Superglue on the (M42) Rollover Hoop and the (M43) Fuel Inlet.
Using small scissors cut out the Vac-u-form Clear Windscreen and attach it with windscreen/canopy glue or CA Glue (risky)

Use a small dab of CA Glue to attach the (A52) Mirrors to the side of the windscreen


Attach wheels to the hubs and glue on the (A49) Rear Wheel nuts and (A52) Front Wheel Nuts
Step 7 – Apply Decals


